Deploying AD RMS in a Test Environment
We recommend that you first use the steps provided in this guide in a test lab environment. Step- by-step guides are not necessarily meant to be used to deploy Windows Server features without additional deployment documentation and should be used with discretion as a stand-alone
document.
Upon completion of this step-by-step guide, you will have a decommissioned AD RMS infrastructure. You can then test and verify AD RMS functionality by opening a rights-protected document and ensuring that the document is decrypted.
![]()
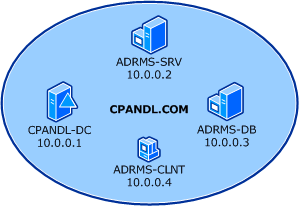
The test environment described in this guide includes four computers connected to a private network and using the following operating systems, applications, and services:
Computer Name | Operating System | Applications and Services |
ADRMS-SRV | Windows Server 2008 | AD RMS, Internet Information Services (IIS) 7.0, World Wide Web Publishing Service, and Message Queuing |
CPANDL-DC | Windows Server 2008 or Windows Server 2003 with Service Pack 2 (SP2) Note Service Pack 2 for Windows Server 2003 is not required but will be used for the purposes of this guide. | Active Directory or Active Directory Domain Services (AD DS), Domain Name System (DNS) |
ADRMS-DB | Windows Server 2003 with SP2 Note Service Pack 2 for Windows Server 2003 is not required but will be used for the purposes of this guide. | Microsoft SQL Server® 2005 Standard Edition with Service Pack 2 (SP2) Note Service Pack 2 for SQL Server 2005 Standard Edition is not required but will be used for the purposes of this guide. |
ADRMS-CLNT | Windows Vista® | Microsoft Office Word 2007 Enterprise Edition |
![]()
![]()
![]()
Note
For more information about the system requirements for installing AD RMS, see http://go.microsoft.com/fwlink/?LinkId=84733.
The computers form a private intranet and are connected through a common hub or Layer 2 switch. This configuration can be emulated in a virtual server environment if desired. This step- by-step exercise uses private addresses throughout the test lab configuration. The private network ID 10.0.0.0/24 is used for the intranet. The domain controller is named CPANDL-DC for the domain named cpandl.com. The following figure shows the configuration of the test environment:
Step 1: Decommission AD RMS Root Cluster
![]()
Decommissioning refers to the entire process of removing the AD RMS cluster and its associated databases from an organization. This process allows you to save rights-protected files as ordinary files before you remove AD RMS from your infrastructure so that you do not lose access to these files.
Decommissioning an AD RMS cluster is achieved by doing the following:
• Enable the decommissioning service.
• Modify permissions on the decommissioning pipeline.
• Configure the AD RMS-enabled application to use the decommissioning pipeline.
Enable the decommissioning service
The decommissioning service disables all other AD RMS services in the cluster. When the decommissioning service is enabled, AD RMS clients can request only a key to decrypt rights- protected content. The decommissioning service is enabled by using the Active Directory Rights Management Services console.
![]()
To enable the decommissioning service
1. Log on to ADRMS-SRV as cpandl\adrmsadmin.
2. Click Start, point to Administrative Tools, and then click Active Directory Rights
Management Services.
3. If the User Account Control dialog box appears, confirm that the action it displays is what you want, and then click Continue.
4. Expand the AD RMS cluster, expand Security Policies, and then
7
click Decommissioning.
5. In the Actions pane, click Enable Decommissioning.
6. Click Decommission.
![]()
Caution
Once decommissioning has been enabled on the AD RMS cluster, it cannot be reversed.
7. Click Yes, confirming that you want to decommission the AD RMS cluster.
Set permission on the decommissioning pipeline After the decommissioning service is enabled on the AD RMS cluster, you must modify the permissions on the decommissioning pipeline so that AD RMS users can connect to it. By default, only the local SYSTEM account has access to the pipeline. You should give the AD RMS Service Group the Read & execute permission on the decommission folder. Then on the decommission.asmx file, you should give everyone the Read & execute permission. The decommission pipeline is located in the %systemroot%\inetpub\wwwroot\_wmcs folder, where
%systemroot% is the volume on which Windows Server 2008 is installed.
![]()
To modify the permissions on the decommissioning pipeline
1. Log on to ADRMS-SRV as cpandl\administrator.
2. Click Start, type %systemdrive%\inetpub\wwwroot\_wmcs in the Start Search box, and then press ENTER.
3. Right-click the decommission folder, and then click Properties.
4. Click the Security tab, click Edit, and then click Add.
5. In the Select Users, Computers, or Groups box, type ADRMS-SRV\AD RMS Service
Group, and then click OK.
6. Click OK twice to close the decommission properties.
7. Double-click the decommission folder, right-click decommission.asmx, and then click Properties.
8. Click the Security tab, click Edit, and the click Add.
9. In the Select Users, Computers, or Groups box, type Everyone, and then click OK. In the Windows Security dialog box, enter the name and password of the cpandl\administrator account.
10. Click OK twice to close the properties sheet.
![]()
Caution
When the AD RMS cluster is operating in decommissioning mode, all users, whether or not they had rights to the original rights-protected content, can obtain a content key and
gain full rights to the content.
Configure the AD RMS-enabled application to use the decommissioning pipeline
Once the AD RMS cluster is in decommissioning mode, you must configure the AD RMS-enabled applications to obtain a content key from the decommissioning service and permanently decrypt the rights-protected content. The AD RMS client itself has no part in the decommissioning process.
![]()
To configure the AD RMS-enabled application to use the decommissioning pipeline
1. Log on to ADRMS-CLNT as cpandl\nhollida.
2. Click Start, type regedit in the Start Search box, and then press ENTER.
![]()
Caution
Incorrectly editing the registry may severely damage your system. Before making changes to the registry, you should back up any valued data on the computer.
3. Navigate to HKEY_CURRENT_USER\Software\Microsoft\Office\12.0\Common\DRM.
4. Right-click DRM, point to New, and then click Key.
5. Type Decommission as the name for the registry key, and then press ENTER.
6. Right-click Decommission, point to New, and then click String Value.
7. Type https://adrms-srv.cpandl.com/_wmcs/licensing, and then press ENTER.
8. Double-click the registry entry.
9. In the Value data box, type https://adrms-srv.cpandl.com/_wmcs/decommission, and then click OK.
10. Close Registry Editor.
11. Repeat steps 1-10 for Stuart Railson and Limor Henig.
Step 2: Verifying AD RMS Functionality
![]()
Once the content is decrypted, the user should then save the content without AD RMS protection. To use the decommissioning service, the user must have been previously enrolled within the
AD RMS infrastructure. A user without an activated AD RMS client cannot use the
decommissioning service to gain access to rights-protected content.
If the decommissioning service is working correctly, any user in the domain, using a computer with the AD RMS-enabled application configured to use the decommissioning service, can open any file that was rights-protected by the AD RMS cluster being decommissioned, remove the rights protection, and save the file. To verify this, you log on as Limor Henig, open the ADRMS- TST.docx file that was created with rights protection in the Windows Server Active Directory
Rights Management Services Step-by-Step Guide, remove the rights protection, and save the file.
![]()
To save a document without rights protection
1. Log on to ADRMS-CLNT as Limor Henig (cpandl\lhenig).
2. Click Start, point to All Programs, point to Microsoft Office, and then click Microsoft
Office Word 2007.
3. Click the Microsoft Office Button, click Open, and then type \\ADRMS-DB\PUBLIC
\ADRMS-TST.docx.
4. When the document opens, click the Change Permissions button and clear the Restrict permissions to this document check box, and then click OK.
5. Save the file as you normally would anything other document.
You have successfully enabled the AD RMS decommissioning service, removed rights-protection from a document, and then saved it without rights-protection. Once you have ensured that all rights-protected content is decrypted and saved without rights-protection, you can unregister the SCP by using the Active Directory Rights Management Services console, uninstall AD RMS, and
reprovision these servers for other services.