This step-by-step guide illustrates how to deploy Active Directory® Group Policy objects (GPOs) to configure Windows Firewall with Advanced Security in Windows Vista® and Windows Server® 2008. Although you can configure a single server locally by using Group Policy Management tools directly on the server, that method is not consistent or efficient when you have many computers to configure. When you have multiple computers to manage, create and edit GPOs, and then apply those GPOs to the computers in your organization.
The goal of a Windows Firewall with Advanced Security configuration in your organization is to improve the security of each computer by blocking unwanted network traffic from entering the computer. Network traffic that does not match the rule set of Windows Firewall with Advanced Security is dropped. You can also require that the network traffic which is allowed must be protected by using authentication or encryption. The ability to manage Windows Firewall with Advanced Security by using Group Policy allows an administrator to apply consistent settings across the organization in a way that is not easily circumvented by the user.
In this guide, you get hands-on experience in a lab environment using Group Policy management tools to create and edit GPOs to implement typical firewall settings. You also configure GPOs to implement common server and domain isolation scenarios and see the effects of those settings.
Scenario Overview
In this guide, you learn about how to create and deploy settings for Windows Firewall with Advanced Security by stepping through procedures that illustrate the common tasks you have to perform in a typical scenario.
Specifically, you configure settings in GPOs to control the following Windows Firewall with Advanced Security options:
• Enable or disable the Windows Firewall, and configure its basic behavior.
• Determine which programs and network ports are allowed to receive inbound network traffic.
• Determine which outbound network traffic is allowed or blocked.
• Support network traffic that uses multiple or dynamic ports, such as those that use Remote Procedure Call (RPC), or the File Transfer Protocol (FTP).
• Require that all network traffic entering specific servers be protected by Internet Protocol security (IPsec) authentication and optionally encrypted.
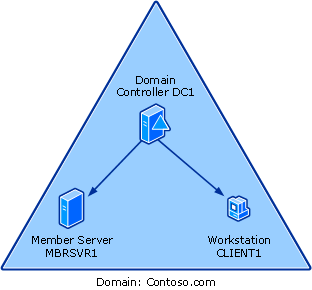
You work with several computers that perform common roles found in a typical network environment. These include a domain controller, a member server, and a client computer, as shown in the following illustration.
The scenario described in this guide includes viewing and configuring firewall settings, and configuring a domain isolation environment. It also includes server isolation, which requires group membership to access a server and can optionally require that all traffic to the server is encrypted. Finally, it includes a mechanism to allow trusted network devices to bypass firewall rules for troubleshooting.
Each of the scenario steps are described in the following sections.
Examining default settings on clients and servers
In this section, you use Windows Firewall settings in Control Panel, the netsh command-line tool, and the Windows Firewall with Advanced Security Microsoft Management Console (MMC) snap- in to examine the default Windows Firewall with Advanced Security settings on the both the CLIENT1 and MBRSVR1 computers. Using the tools directly on a local computer is useful to see the current configuration and the firewall and connection security rules that are active on the computer.
Deploying basic settings by using Group Policy
In this section, you create a Group Policy object (GPO) that contains basic firewall settings, and then assign that GPO to the organizational unit (OU) that contains the client computer. To ensure that only the correct computers can apply the GPO settings, you use Windows Management Instrumentation (WMI) and security group filtering to restrict applying the GPO to computers that are running the correct version of Windows.
The GPO that you configure includes some of the basic Windows Firewall with Advanced Security settings that are part of a typical enterprise’s GPO settings, such as:
• Any local firewall setting created by a user, even a local administrator, is ignored.
• Ensure that the firewall is enabled with your specified handling of network traffic, and cannot be disabled.
• The computer does not display the notification when Windows Firewall with Advanced Security blocks a program from listening on a network port.
Creating rules that allow required inbound network traffic
In this section, you create inbound firewall rules that:
• Use predefined rule groups to support common network services.
• Allow a program to listen for any network traffic it needs to operate.
• Allow a program to listen for network traffic only on a specified TCP or UDP port.
• Allow a network service to listen for network traffic.
• Limit network traffic from only specified IP addresses, and to specific types of networks.
• Apply different firewall behavior based on the network location type to which the computer is connected.
• Support programs that use the dynamic port assigning capabilities of RPC.
Creating rules that block unwanted outbound network traffic
In this section, you configure outbound firewall rules to block unapproved programs from sending outbound traffic from a computer.
Deploying domain isolation settings
In this section, you enable GPO settings on your domain member computers that force them to accept network connection requests only from other domain member computers.
Isolating a server by requiring encryption and group membership
In this section, you create connection security and firewall rules that require that a server or group of servers allow network traffic only from computers that are members of an authorized group.
The rules also specify that the traffic to and from these servers must be encrypted.
Creating rules that allow specific computers or users to bypass firewall block rules
In this section, you configure firewall and connection security rules to allow specific authorized users or computers, such as the network port scanners used by network troubleshooting and security teams, to bypass the firewall.
Technology Review for Deploying Windows Firewall with Advanced Security
Windows Firewall with Advanced Security combines a host-based firewall and an Internet Engineering Task Force (IETF)-compliant implementation of Internet Protocol security (IPsec).
As a host-based firewall, Windows Firewall with Advanced Security runs on each computer that is running Windows Server® 2008 or Windows Vista® to provide local protection from network attacks that might pass through your perimeter network firewall or originate from inside your organization.
Windows Firewall with Advanced Security also provides IPsec-based computer-to-computer connection security which allows you to protect your network data by setting rules that require authentication, integrity checking, or encryption when your computers exchange data.
Windows Firewall with Advanced Security works with both Internet Protocol version 4 (IPv4) and IPv6 traffic.
This section of the guide provides a brief review of these features to support your understanding of the scenarios that you examine in later sections of this guide.
• Network Location Awareness
• Host Firewall
• Connection Security and IPsec
• Group Policy
Network Location Awareness
Windows Vista® and Windows Server® 2008 support network location awareness, which allows network-aware programs to alter their behavior based on how the computer is connected to the network. In the case of Windows Firewall with Advanced Security, you can create rules that apply only when the profile associated with a specific network location type is active on your computer.
How Network Location Awareness works
The following diagram shows the network location types that can be detected by Windows.
Windows detects the following network location types:
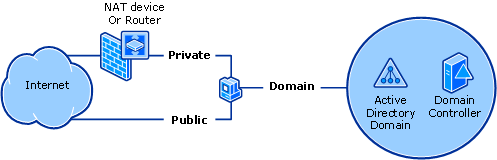
• Public. By default, the public network location type is assigned to all networks when they are first connected. A public network is considered to be shared with the public, with no protection between the local computer and any other computer.
• Private. The private network location type can be manually selected by a local administrator for a connection to a network that is not directly accessible by the public. This connection can be to a home or office network that is isolated from publicly accessible networks by using a firewall device or a device that performs network address translation (NAT). Wireless networks should be protected by using an encryption protocol such as Wi-Fi Protected
Access (WPA) or WPAv2. A network is never automatically assigned the private network location type; it must be assigned by the administrator. Windows remembers the network, and the next time that you connect to it, Windows automatically assigns the network the private network location type again.
• Domain. The domain network location type is detected when the local computer is a member of an Active Directory domain, and the local computer can authenticate to a domain controller for that domain through one of its network connections. If those conditions are met then the domain network location type is automatically assigned. An administrator cannot manually assign this network location type.
Windows Firewall with Advanced Security stores its setting and rules in profiles, and supports one profile for each network location type. The profile associated with the currently detected network location type is the one that is applied to the computer. If the network location type changes then the rules the profile associated with the new network location type automatically apply.
When you have multiple network adapters attached to your computer, you can be attached to networks of different types. Windows Vista and Windows Server 2008 only support one active network location type at a time. Windows automatically selects the network location type for the least secure network. For example, if a computer has two active connections, one to a public network and one to a private network, Windows selects the public network type to enable the more rigorous security rules in its profile to protect the computer.
Windows XP and Windows Server 2003 support a domain profile that is identical in concept to the one described above. However, instead of supporting both a private and public profile, the earlier versions of Windows support only a ‘standard’ profile. So if you create rules by using the Windows Firewall node in the Administrative Templates section of the Group Policy editor then you can only specify that they apply to the domain and standard profiles. If you specify the standard profile and then apply these rules to a computer that is running Windows Vista or Windows Server 2008 then the rules apply when the computer’s network location profile is set to either private or public. The rules in the domain profile still apply only when the computer’s network location profile is set to domain.
For more information about network location awareness and its use in Windows Firewall with Advanced Security, see the section “Network location-aware host firewall” in Getting Started with Windows Firewall with Advanced Security.
Host Firewall
Windows Firewall with Advanced Security includes a host-based firewall component that is a protective boundary for the local computer, which monitors and restricts information that travels between your computer and its attached networks or the Internet. It provides an important line of defense against someone who might try to access your computer without your permission.
In Windows Vista and Windows Server 2008, the host firewall in Windows Firewall with Advanced Security is turned on by default, with unsolicited inbound network traffic blocked, and all outbound traffic allowed.
How the host firewall works
Network traffic flowing in and out of your computer can be categorized as shown in the following diagram.
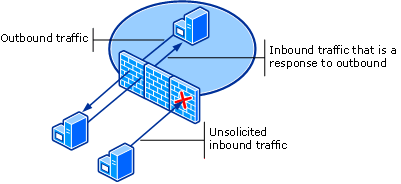
Network traffic consists of a packet or a stream of packets that are sent from a source port on one computer to a destination port on another computer. A port is just an integer value in the network packet that identifies the program on the sending or receiving end of the connection. Generally, only one program listens on a port at a time. To listen on a port, the program registers itself and the port numbers to which it must listen with the operating system. When a packet arrives at the local computer, the operating system examines the destination port number, and then provides the contents of the packet to the program registered to use that port. When using the TCP/IP protocol, a computer can receive network traffic addressed by using a specific transport protocol such as TCP or UDP, and on any one of the ports numbered from 1 to 65,535. Many of the lower numbered ports are reserved for well-known services, such as a Web server that uses Hyper Text Transport Protocol (HTTP) on TCP port 80, Telnet remote terminal services on TCP port 23, or Simple Mail Transfer Protocol (SMTP) on port 25.
Windows Firewall with Advanced Security works by examining the source and destination addresses, source and destination ports, and protocol numbers of a packet, and then comparing them to the rules that are defined by the administrator. When a rule matches a network packet then the action specified in the rule (to allow or block the packet) is taken. In Windows Vista and Windows Server 2008, functionality in Windows Firewall with Advanced Security is expanded to include allowing or blocking network packets based on whether they are protected by IPsec authentication or encryption.
For more information about the host firewall functionality and the new features added to Windows Firewall with Advanced Security in Windows Vista and Windows Server 2008, see Getting Started with Windows Firewall with Advanced Security, and Windows Firewall.
Connection Security and IPsec
Internet Protocol Security (IPsec) is a framework of open standards for protecting communications over TCP/IP networks by using cryptographic security services. IPsec supports network-level peer authentication, data origin authentication, data integrity, data confidentiality (encryption), and replay protection. The Microsoft implementation of IPsec is based on standards developed by the Internet Engineering Task Force (IETF) IPsec working group.
The implementation of IPsec included with Windows Vista and Windows Server 2008 is fully integrated into the Network layer (layer 3) of the Open Systems Interconnection (OSI) network reference model. This lets it provide protection to any IP-based protocol in a manner that is transparent to the programs that are running on the computer.
IPsec is an important layer in a defense-in-depth strategy to protect your organization’s network- accessible resources.
How IPsec works
IPsec provides a variety of connection security services to network traffic. You can configure each service to apply to specific network traffic by creating a connection security rule in Windows Firewall with Advanced Security that identifies the characteristics of the network traffic to protect, and the nature of the protection to be applied.
• Source authentication. Source authentication ensures that each computer that is participating in a connection receives proof that the other computer (and optionally the user on the other computer) is truly the entity that it claims to be.
Authentication involves each computer providing some form of credentials to the other computer that can be proved to be from the claimed source. Kerberos tokens, which can be checked with a domain controller, or a computer or user certificate which can be cryptographically checked against its trusted root certificate, are among the authentication methods generally used.
• Data integrity. Data integrity ensures that the packet that is received is identical to the packet that was transmitted, and that it was not damaged or modified in transit.
A network packet that is part of the network connection includes a cryptographic hash of the packet. The hash is calculated by the sending computer, encrypted, and included in the packet. The receiving computer calculates its own hash on the received packet, and after decrypting the included hash, compares the two hash values. If they match, the packet is accepted and processed. If they do not match, then the packet was damaged or possibly modified in transit, and is dropped.
• Data confidentiality. Data confidentiality ensures that the information included in the network connection cannot be accessed or read by non-authorized computers or users.
When specified, every network packet that is part of the network connection has its data payload encrypted. Various strength encryption protocols are available for use.
For more information about IPsec, see:
• Getting Started with Windows Firewall with Advanced Security
• Introduction to Server and Domain Isolation
For more information about the IPsec functionality in Windows Firewall with Advanced Security and its use in supporting serer and domain isolation, see:
• The IPsec page on TechNet
• The Server and Domain Isolation page on TechNet
Group Policy
Group Policy enables you to perform your administrator tasks more efficiently because it enables centralized computer and user management. Centrally managing the configuration settings of computers and users on the network can decrease the total cost of ownership for the IT infrastructure.
How Group Policy works
Group Policy is a technology available as part of an Active Directory domain services implementation. When member computers connect to an Active Directory domain, they automatically retrieve and apply Group Policy objects (GPOs) from the domain controller.
A GPO is a collection of settings that can be created by a domain administrator, and then applied to groups of computers or users in the organization.
Windows Vista allows you to use Group Policy to centrally manage a greater number of features, components, and security settings than you were able to do in earlier versions of Windows. For example, the number of Group Policy settings has increased from approximately 1,800 in Windows Server 2003 with Service Pack 1 to approximately 2,500 in Windows Vista and Windows Server 2008. These new policy settings help you manage desktops, servers, security settings, and many other aspects of running your network.
Configuration settings and rules that you want to apply to the computers in your organization are stored in Group Policy objects (GPOs) that are maintained on the domain controllers of an Active Directory domain. The GPOs are automatically downloaded to all assigned computers when they connect to the domain. They are then merged with the local GPO stored on the computer, and then applied to the computer’s active configuration. Group Policy provides easy centralized management, and detailed control of which computers receive which GPOs.
Because the capabilities of both firewall rules and the implementation of IPsec are significantly enhanced in Windows Vista and Windows Server 2008, we recommend that administrators leave existing GPO settings in place for earlier versions of Windows and create new GPOs for computers that are running Windows Vista and Windows Server 2008. By applying the new GPOs to the same set of containers as the old GPO settings, and by using WMI filters with each GPO, you can ensure that you apply the most appropriate settings to each computer in your organization.
For more information about Group Policy, see Windows Server Group Policy.
Requirements for Performing the Scenarios
This section describes how to configure computers to try the scenarios for Windows Firewall with Advanced Security in a test lab environment. Step-by-Step guides are not necessarily meant to be used to deploy Windows Server features without accompanying documentation (as listed in the Additional References section). Use this guide as a stand-alone document with discretion.
![]()
Caution
If you accidentally apply Windows Firewall with Advanced Security settings to a GPO that applies to production computers, you can affect their ability to communicate with other computers.
The computers needed for a test lab for this guide include the following:
1. DC1 is a computer that is running Windows Server 2008, Standard or Enterprise Edition, that is configured to provide the following functions:
• The primary domain controller for the Contoso.com Active Directory domain
• A Domain Name System (DNS) server that can resolve names for the Contoso.com DNS zone
2. MBRSVR1 is a computer that is running Windows Server 2008, Standard or Enterprise Edition, configured to provide the following functions:
• A domain member in the Contoso.com domain
• A manager and editor of the Group Policy objects in the Contoso.com domain
• A Telnet server
3. CLIENT1 is a computer that is running Windows Vista, Business, Enterprise, or Ultimate Edition, that is configured as follows:
• A domain member in the Contoso.com domain
Hardware requirements
You must meet the following hardware requirements in order to set up the test lab:
• Three computers that can run the operating systems required for the roles used in this guide (see the “Software Requirements” section later in this guide).
• The computers must be connected to each other by using a network, but we recommend that you use a stand-alone, isolated network that contains nothing but the computers that are used in this guide. The computers can be physical computers attached to a physical network, or virtual machines running in a Microsoft® Virtual Server or Virtual PC environment and connected to an isolated virtual network.
![]()
Caution
If you connect your test network to your production environment or to the Internet then we strongly recommend that you ensure that all computers are updated with the latest security updates and are running appropriate antivirus protection software.
![]()
Note
The steps in this guide assume that your computers are on an isolated test lab network, and that the names, IP addresses, and so on, do not interfere with the operation of other computers on your production environment..
Software requirements
• For DC1: Windows Server 2008, Standard or Enterprise Edition.
• For MBRSVR1: Windows Server 2008, Standard or Enterprise Edition.
• For CLIENT1: Windows Vista, Business, Enterprise, or Ultimate Edition.
Required common procedures
The procedures that are shown here frequently occur in this guide, and the steps for them are not included in-line. See the steps listed here any time that you must refer to them.
• The User Account Control dialog box appears whenever you try to perform an administrative task. If your account is a member of the local Administrators group then you can click Continue when you are prompted. If your user account is not an administrator then you must provide the credentials (user name and password) of an account that has the required permissions.
Use the following procedure when you are instructed to open an administrator command prompt.
![]()
To open an administrator command prompt
1. Click Start, click All Programs, and then click Accessories.
2. Right-click Command Prompt, and then click Run as administrator.
Alternatively, you can do the same thing with any shortcut to the command prompt that you put in the Start menu, the Quick Launch bar, or the desktop.
• Use the following procedure when you are instructed to open the Windows Firewall with Advanced Security MMC snap-in.
![]()
To open the Windows Firewall with Advanced Security MMC snap-in
• Click Start, then in the Start Search box, type wf.msc, and then press ENTER. Alternatively:
• On Windows Server 2008 you can click Start, click Administrative Tools, and then click Windows Firewall with Advanced Security.
• On Windows Vista you can click Start, click All Programs, click Administrative Tools, and then click Windows Firewall with Advanced Security.
Setting up the lab computers
First, set up the domain controller and create the domain that has the required user accounts.
![]()
To install and configure the domain controller DC1
1. Install Windows Server 2008 by using the following settings:
2. Set the local Administrator account password to Pass@word1.
3. Configure the network to use the following settings:
• IP address: 192.168.0.1
• Subnet mask: 255.255.255.0
• Default Gateway: Leave blank
• DNS Server address: 192.168.0.1
4. Name the computer DC1. Restart the computer when you are prompted.
5. Install Active Directory by using the following settings:
• Include DNS as part of the installation.
• Create a new domain in a new forest, and name the domain contoso.com.
• Use the password Pass@word1 for all user accounts.
6. After installing Active Directory, restart the computer when you are prompted.
7. Create a new user account in Contoso named Admin1, with a password of Pass@word1.
8. Add Admin1 to the group Domain Administrators.
Now install the member server, and then configure the required services.
![]()
To install and configure the member server MBRSVR1
1. Install Windows Server 2008 by using the following settings:
2. Set the local Administrator account password to Pass@word1.
3. Configure the network to use the following settings:
• IP address: 192.168.0.100
• Subnet mask: 255.255.255.0
• Default Gateway: Leave blank
• DNS Server address: 192.168.0.1
4. Name the computer MBRSVR1. Restart the computer when you are prompted.
5. Join the computer to the contoso.com domain, and then restart the computer when you are prompted.
6. Using Server Manager, install the features Group Policy Management and Telnet Server onto the computer.
7. Configure the Telnet Server service to start automatically whenever the computer starts. Finally, install the workstation client, and configure it.
![]()
To install and configure the client computer CLIENT1
1. Install Windows Vista by using the following settings:
2. When prompted to name the local administrator during setup, name it localadmin, and then set its password to Pass@word1.
3. Name the computer CLIENT1.
4. Identify the network location type as Work.
5. Configure the network to use the following settings:
• IP address: 192.168.0.101
• Subnet mask: 255.255.255.0
• Default Gateway: Leave blank
• DNS Server address: 192.168.0.1
6. Name the computer CLIENT1. Restart the computer when you are prompted.
7. Using the Turn Windows features on and off option in the Program and Features control panel program, install the Telnet Client onto the computer.
8. Join the computer to the contoso.com domain, and then restart the computer when you are prompted.
Examining Default Settings on Clients and
Servers
The functionality provided by Windows Firewall with Advanced Security in Windows Vista and Windows Server 2008 can be accessed by using three different user interfaces:
• Windows Firewall icon in Control Panel. This interface provides access to only basic host firewall settings and is intended for a consumer in a non-managed environment. The Windows Firewall icon in Control Panel has limited functionality and is designed for consumer control of a single computer, instead of enterprise administrator control over lots of computers.
• Netsh Advfirewall command-line tool. The netsh command provides the ability to modify many aspects of a computer’s network configuration. This includes the ability to configure the Windows Firewall with Advanced Security settings and rules for a single computer or a GPO that can be applied to lots of computers in an enterprise environment.
• Windows Firewall with Advanced Security Microsoft Management Console (MMC) snap-in. This interface provides access to both firewall and IPsec functionality, and is the primary means for an administrator to manage both an individual computer and a GPO.
Steps for examining default settings on clients and servers
In this section of the guide, you learn how to start see commenttool to see what functionality is available through it. By using each of these tools you see the default and current configuration in Windows Firewall with Advanced Security for computers that are running Windows Vista and Windows Server 2008.
Step 1: Starting W indows Firewall in Control Panel
Step 2: Examining the Basic Options Available by Using the Control Panel Interface
Step 3: Examining the Basic Options by Using the Netsh Command-Line Tool
Step 4: Examining the Basic Options Available W hen Using the Windows Firewall with Advanced Security MMC snap-in
Step 1: Starting Windows Firewall in Control Panel
In this step, you open the Windows Firewall icon in Control Panel on each of your domain member computers.
![]()
To open the Windows Firewall icon in Control Panel on CLIENT1
1. On CLIENT1, log on as contoso\admin1 with the password Pass@word1.
2. Click Start, and then click Control Panel.
In Windows Vista, the default Control Panel view is Control Panel Home.
3. Click Security, and then click Windows Firewall.
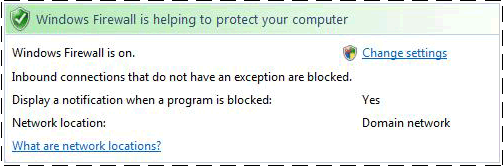
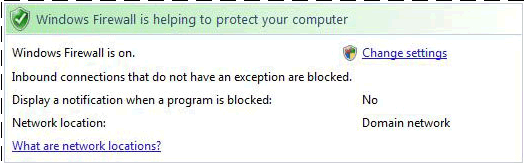
4. On the Windows Firewall page, note the following default settings that are part of a typical Windows Vista installation, as shown in the following figure:
• Windows Firewall is enabled.
• Unsolicited inbound connections that do not have an exception are blocked.
• When a program tries to listen for incoming connections and is prevented from doing this by the firewall, a notification is displayed to the user.
• The current settings are those assigned to the Domain network location profile because the computer is joined and authenticated to an Active Directory domain.
5. Keep Windows Firewall in Control Panel open.
Now examine the same interface on Windows Server 2008.
![]()
To open the Windows Firewall icon in Control Panel on MBRSVR1
1. On MBRSVR1, log on as contoso\admin1 with the password Pass@word1.
2. Click Start, and then click Control Panel.
In Windows Server 2008, the default Control Panel view is Classic View.
3. Click Windows Firewall.
4. On the Windows Firewall page, note the following default settings that are part of a typical Windows Server 2008 installation:
• Windows Firewall is enabled.
![]()
Note
If the computer that is running Windows Server was upgraded from an earlier version of Windows Server that included Windows Firewall then the On/Off state is preserved in the upgrade.
• Unsolicited inbound connections that do not have an exception are blocked.
• When a program tries to listen for incoming connections and is prevented from doing this by the firewall, a notification is not displayed to the user.
![]()
Note
This differs from the default setting on Windows Vista.
• The current settings are those assigned to the Domain network location profile because the computer is joined to a domain and authenticated.
5. Keep Windows Firewall in Control Panel open.
Step 2: Examining the Basic Options Available by Using the
Control Panel Interface
In this step, you examine the options that you can configure by using the Windows Firewall icon in Control Panel, and compare the differences between Windows Vista and Windows Server 2008.
![]()
To examine the options available in the Windows Firewall icon in Control Panel
1. On both CLIENT1 and MBRSVR1, click Change settings on the Windows Firewall
page.
2. Examine the tabs for the few settings that you can configure by using this interface. Any changes you make here apply only to the currently configured network location profile (Domain network). Compare the differences between the default settings on MBRSVR1 and CLIENT1.
• General tab. On this tab, you can enable or disable the firewall. In addition, you can choose to block all incoming connections, even when an exception exists that ordinarily allows that connection.
![]()
Caution
Do not disable the firewall by stopping the Windows Firewall (MpsSvc) service. The Windows Firewall service also implements Windows Service Hardening, which provides additional protections for other Windows services. Microsoft does not support disabling the Windows Firewall service. Instead, use the interface shown here in the Windows Firewall icon in Control Panel or use the Windows Firewall with Advanced Security MMC snap-in. For more information about Windows Service Hardening, see Windows Vista Securityand Data Protection Improvements.
![]()
Note
Disabling the firewall by using the Off setting on the Windows Firewall Settings page does not stop the Windows Firewall (MpsSvc) service. It does stop Windows Firewall from filtering any inbound or outbound network traffic according to the configured rules.
On MBRSVR1, you see no differences on the General tab compared to a computer that is running Windows Vista, unless the operating system was upgraded from an earlier version of Windows Server that had Windows Firewall installed but disabled. When a computer that is running Windows Server is upgraded to a later version of Windows Server, the On/Off state of the Windows Firewall is maintained.
• Exceptions tab. On this tab you can see the exceptions that have been defined to allow specific network connections. The selected exceptions are enabled. Most of the entries displayed here represent predefined rule sets that are included with Windows. If you click the name of an exception and then click Properties, a description of the exception appears. You can also create your own custom program-based and port- based exceptions on this page. You can specify a scope to an exception: any computer, the local subnet only, or a custom list of addresses and subnets.
A computer that is running Windows Server 2008 and configured to have a network server role, such as a domain controller, typically has many more exceptions enabled to allow access to its services than other computers. For example, the MBRSVR1 computer has the Telnet exception rule enabled because you installed that service as part of the setup for this guide. The rule was created and enabled automatically during the installation of the Telnet service.
By default on computers that are running Windows Server 2008, the Notify me when Windows Firewall blocks a new program option is not selected.
• Advanced tab. On this tab you can specify which network connections, as defined in Network and Sharing Center, are protected by the Windows Firewall. By default, all network connections are protected. You can also use the Restore Defaults button to remove the complete custom configuration that you have applied to the firewall.
3. On bothCLIENT1 and MBRSVR1, click OK on the Windows Firewall Settings page, close Windows Firewall, and then close Control Panel.
Step 3: Examining the Basic Options by Using the Netsh
Command-Line Tool
In this step, you try an alternative method for seeing the basic firewall configuration options by using the Netsh command-line tool.
![]()
To examine the basic firewall options by using Netsh
1. On MBRSVR1, open an administrator command prompt.
2. At the command prompt, run netsh advfirewall show currentprofile.
![]()
Important
You must use the advfirewall context instead of the older firewall or ipsec contexts. Advfirewall is new to the netsh command in this version of Windows. The firewall and ipsec contexts still exist, but are provided only for compatibility with Group Policy settings that are created by using an earlier version of Windows.
3. Examine the output and compare to what you saw earlier in the Windows Firewall icon in Control Panel. Your output resembles the following figure.
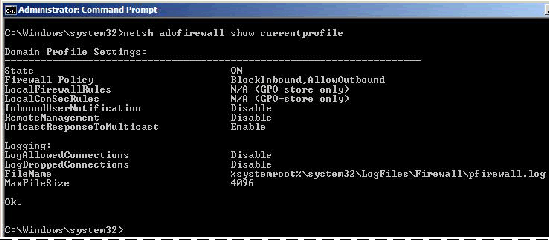
The values State, Firewall Policy, and InboundUserNotification correspond to the basic settings that you examined in the Windows Firewall icon in Control Panel in the previous steps. The other settings shown in the netsh output are not configurable by using the Windows Firewall icon in Control Panel. They are configurable by using the netsh command-line tool, and the Windows Firewall with Advanced Security MMC snap- in.
4. Close the command prompt.
Step 4: Examining the Basic Options Available When Using the
Windows Firewall with Advanced Security MMC snap-in
In this step, you use the Windows Firewall with Advanced Security MMC snap-in to see the basic options available.
![]()
To examine the basic options by using the Windows Firewall with Advanced Security MMC snap-in
1. On MBRSVR1, open Windows Firewall with Advanced Security.
2. Examine the three panes of the Windows Firewall with Advanced Security snap-in.
• The navigation pane enables you to select from the main functional areas.
• The details pane displays information about currently selected functional area.
• The actions pane displays shortcuts to available tasks that are relevant to the currently selected functional area.
3. In the navigation pane, select the node labeled Windows Firewall with Advanced Security.
The details pane displays the basic state information for each network location profile. Because MBRSVR1 is connected to the domain, the entry for that network location profile in the Overview section reads Domain Profile is Active.
4. In the navigation pane, right-click Windows Firewall with Advanced Security, and then click Properties.
5. Note that there are four tabs, one for each network location profile and one for IPsec settings. The changes you make on each profile tab only apply to the computer when the specified network location profile is active. The IPsec Settings tab enables you to configure the default IPsec protocol parameters that are used when a connection security rule does not specify otherwise.
6. Click the Private Profile tab as an example. Note that for each profile, you can enable or disable the firewall, configure the default firewall behavior for handling unsolicited inbound connections and outbound connections, and specify logging options.
7. Click Customize in the Settings section. Note that for each profile, you can configure notifications and how your computer responds to incoming multicast or broadcast network traffic.
The Rule merging section is configurable only when you are managing the settings of a Group Policy object (GPO). The settings here indicate whether the Group Policy administrator allows a local Administrator to apply their own locally created firewall and connection security rules. If set to No then only GPO-supplied rules are applied to the computer and any locally defined rules are ignored.
8. Click Cancel to return to the main Properties page.
9. Click Customize in the Logging section to examine the options available for creating a log file to capture details about the firewall’s operation. Even though a log file name is specified, nothing is written to the file until you select Yes in one of the two lists.
10. Set the value of both lists to No to disable logging. You will use this in a later section of the guide.
11. Click Cancel two times to return to the Windows Firewall with Advanced Security snap-in.
12. You can click the other functional areas to see the currently configured Inbound Rules, Outbound Rules, and Connection Security Rules, but do not change any of them at this point.
Deploying Basic Settings by Using Group Policy
Use Group Policy to define and deploy specific configurations for groups of users and computers. These configurations are created by using the Group Policy Object Editor and are contained in one or more Group Policy objects (GPOs) stored in Active Directory. To deploy the settings, the GPO is linked to one or more Active Directory containers, such as a site, a domain, or an organizational unit (OU). The settings in the GPO are then applied automatically to the users and computers whose objects are stored in those Active Directory containers. You can configure the work environment for your users once, and then rely on Group Policy to enforce your settings.
For an overview of Group Policy, see the Group Policy technology review in this guide. For more information about Group Policy, see Windows Server Group Policy at http://go.microsoft.com/fwlink/?linkid=93542.
Steps for deploying basic settings by using Group Policy
In this section, you create a set of OUs to contain your computer accounts. You then create GPOs that contain settings that are intended for a specific set of computers. You use the Group Policy Management Editor to configure a GPO that contains basic firewall settings, and then assign that GPO to the OU that contains your test computer. Finally, you create and apply a Windows Management Instrumentation (WMI) filter to restrict the application of the GPO to computers that are running a specified operating system. This enables you to have multiple groups of computers in a single Active Directory container (OU, site, or domain) that require different settings, and ensure that each receives the correct GPO.
The GPOs that you configure include some of the basic Windows Firewall with Advanced Security settings that are part of typical enterprise firewall settings.
Step 1: Creating OUs and Placing Computer Accounts in Them
Step 2: Creating the GPOs to Store Settings
Step 3: Adding the GPO Setting to Enable the Firewall on Member Client Computers
Step 4: Deploying the Initial GPO with Test Firewall Settings
Step 5: Adding the Setting that Prevents Local Administrators from Applying Conflicting Rules
Step 6: Configuring the Rest of Your Client Computer Firewall Settings
Step 7: Creating WMI and Group Filters
Step 8: Enabling Firewall Logging
Step 1: Creating OUs and Placing Computer Accounts in Them
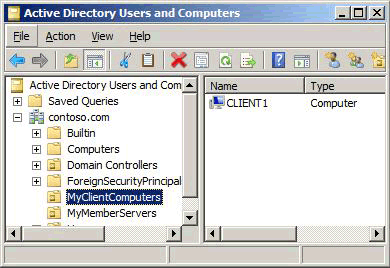
In this step, you use the Active Directory Users and Computers MMC snap-in to create two OUs in your domain hierarchy: one for member servers, and one for member client computers. You then move each computer account to the relevant new OU.
![]()
To create your OUs and put your computer accounts in them
1. On DC1, click Start, click Administrative Tools, and then click Active Directory Users and Computers.
2. In the navigation pane, right-click contoso.com, click New, and then click Organizational Unit.
3. In the Name box, type MyMemberServers, and then click OK.
4. Right-click contoso.com again, and then click New, and then click Organizational Unit.
5. In the Name box, type MyClientComputers, and then click OK.
6. In the navigation pane, click Computers.
7. In the details pane, right-click CLIENT1, and then click Move.
8. In the Move dialog box, click MyClientComputers, and then click OK.
9. In the details pane, right-click MBRSVR1, and then click Move.
10. In the Move dialog box, click MyMemberServers, and then click OK.
When you have finished, your display resembles the following figure.
11. Close the Active Directory Users and Computers snap-in.
Step 2: Creating the GPOs to Store Settings
In this step, you create a new GPO. Because it is not yet linked to any OU, the settings that you configure do not yet apply to any computers.
![]()
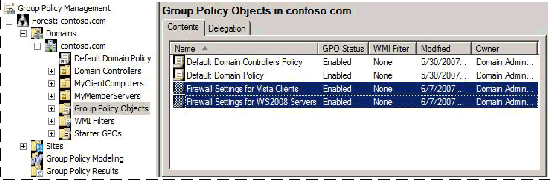
To create the GPOs
1. On MBRSVR1, click Start, click Administrative Tools, and then click Group Policy Management.
2. In the navigation pane, expand Forest: contoso.com, expand Domains, and then expand contoso.com.
3. In the navigation pane, right-click Group Policy Objects, and then click New.
4. In the Name box, type Firewall Settings for WS2008 Servers, and then click OK.
5. In the navigation pane, right-click Group Policy Objects, and then click New.
6. In the Name box, type Firewall Settings for Vista Clients, and then click OK.
7. Select the Group Policy Objects node, and your display resembles the following figure.
Step 3: Adding the GPO Setting to Enable the Firewall on
Member Client Computers
In this step, you configure your client GPO to include a setting that enables Windows Firewall on all clients running Windows Vista to which the GPO applies.
![]()
To add the GPO setting to enable the firewall on member client computers
1. On MBRSVR1, in Group Policy Management, click Group Policy Objects, right-click Firewall Settings for Vista Clients, and then click Edit.
2. In Group Policy Management Editor, right-click the top node Firewall Settings for Vista Clients [DC1.contoso.com] Policy, and then click Properties.
3. Select the Disable User Configuration settings check box, and then click OK.
![]()
Note
You can remove either the user or computer section whenever it is not needed. This improves performance on the client computer when it is applying a GPO.
4. In the Confirm Disable dialog box, click Yes, and then click OK.
5. Under Computer Configuration, expand Windows Settings, expand Security Settings, and then expand Windows Firewall with Advanced Security.
6. Click the node Windows Firewall with Advanced Security – LDAP://cn
{GUID},cn=policies,cn=system,DC=contoso,DC=com, where GUID is a unique number assigned to your domain.
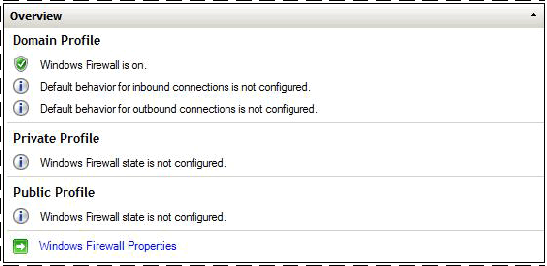
7. In the details pane, under Overview, notice that for each network location profile Windows Firewall state is not configured, and then click Windows Firewall Properties.
8. On the Domain Profile tab, click the drop-down list next to Firewall state, and then click On (recommended).
![]()
Note
This might appear to be an unnecessary step, because the firewall is turned on by default on the client computers. However, a local administrator can disable the firewall if you leave this setting as Not configured. Setting it in the GPO as shown in this step turns it on and prevents the local administrators from disabling it.
9. Click OK to save your changes. Note in the details pane that Domain Profile now shows Windows Firewall is on.
10. Close Group Policy Management Editor.
Step 4: Deploying the Initial GPO with Test Firewall Settings
In this step, you link your GPO to an OU to apply it to your member client computer.
![]()
To deploy your firewall settings
1. On MBRSVR1, in Group Policy Management, in the navigation pane, right-click MyClientComputers, and then click Link an Existing GPO.
2. In the Group Policy objects list, click Firewall Settings for Vista Clients, and then click OK.
In the next procedure, you confirm that the client computer receives and applies the new GPO
settings.
![]()
To test your new GPO
1. On CLIENT1, open an administrator command prompt.
2. In the command prompt window, type gpupdate /force, and then press ENTER. Wait until the command finishes before moving to the next step.
3. To validate that the GPO was correctly applied, run gpresult /r /scope computer. In the output, look for the section Applied Group Policy Objects. Confirm that it contains entries for both Firewall Settings for Vista Clients and the Default Domain Policy.
4. Open the Windows Firewall with Advanced Security snap-in.
5. Right-click the top node Windows Firewall with Advanced Security on Local Computer, and then click Properties.
6. Note that the Firewall State setting is On, and that the list control is disabled. It is now controlled by Group Policy and cannot be changed locally, even by an administrator.
7. Close the Properties dialog box, and the Windows Firewall with Advanced Security snap-in.
Step 5: Adding the Setting that Prevents Local Administrators from Applying Conflicting Rules
In this step, you configure and test a setting that prevents firewall rules created by local administrators from being applied to the computer and possibly conflicting with the GPO-deployed rules.
By default members of the local Administrators group on the computer can use Windows Firewall with Advanced Security to create and enable firewall and connection security rules. These local rules are then merged with the rules received from Group Policy and applied to the computer’s active configuration. The setting described in this section prevents the locally defined rules from
merging with the rules that are contained in the deployed GPOs.
![]()
Important
Although this setting prevents a local administrator from applying a rule, it also prevents Windows Firewall with Advanced Security from prompting the user about a new program and creating an inbound rule when the user approves. If you enable this setting then you must ensure that every program that requires firewall rules has the correct rules defined in your GPOs.
![]()
To confirm that a local administrator can create a conflicting rule
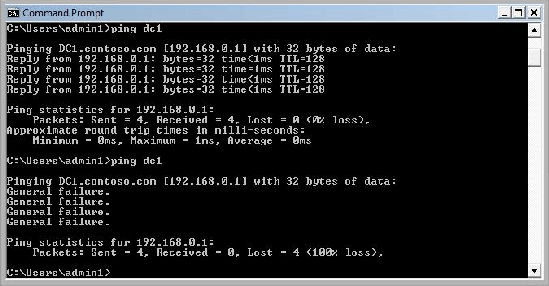
1. On CLIENT1, at the administrator command prompt, run ping dc1.
The ping command works, which indicates that it can communicate with DC1.
2. Start the Windows Firewall with Advanced Security snap-in.
3. Under Windows Firewall with Advanced Security, right-click Outbound Rules, and then click New Rule.
4. On the Rule Type page of the New Outbound Rule Wizard, click Custom, and then click Next.
5. On the Program page, select All programs, and then click Next.
6. On the Protocol and Ports page, use the default settings, and then click Next.
7. On the Scope page, use the default settings, and then click Next.
8. On the Action page, use the default settings, and then click Next.
9. On the Profile page, clear the check boxes for Private and Public, but leave Domain selected, and then click Next.
10. On the Name page, enter the name A Test Rule (use an ‘A’ as the first character to ensure the rule appears at the top of the list), and then click Finish.
This creates a firewall rule that blocks all network traffic, effectively breaking communications for the computer.
11. Return to the command prompt window, and run ping dc1 again.
The ping command fails, as shown in the following figure, because the local firewall rule blocks outgoing communications.
12. In the Windows Firewall with Advanced Security snap-in, click Outbound Rules in the navigation pane, right-click A Test Rule, and then click Disable Rule. You must disable the rule to re-enable communication for the next steps.
13. Leave the Administrator: Command Prompt window and Windows Firewall with Advanced Security snap-in open.
In the next procedure, you modify the GPO assigned to the client computer to prevent locally defined rules from being merged and applied to the active firewall configuration. Also, you disable the notification that asks the user whether to allow a program for which there are no rules.
![]()
To prevent the computer from using rules and settings defined by local administrators
1. On MBRSVR1, in Group Policy Management, click Group Policy Objects, right-click Firewall Settings for Vista Clients, and then click Edit.
2. In Group Policy Management Editor, expand Computer Configuration, expand Windows Settings, expand Security Settings, and then expand Windows Firewall with Advanced Security.
3. Right-click Windows Firewall with Advanced Security – LDAP://cn={GUID},cn=policies,cn=system,DC=contoso,DC=com, and then click Properties.
4. On the Domain Profile tab, in the Settings section, click Customize.
5. Change the Display a notification setting to No. This prevents Windows from displaying a notification to the user whenever a program is blocked.
6. In the Rule merging section, change the Apply local firewall rules list to No.
7. In the Rule merging section, change the Apply local connection security rules list to No.
8. Click OK two times to return to Group Policy Management Editor.
In the next step, you refresh Group Policy on CLIENT1, and then confirm that locally defined rules cannot block network communications.
![]()
To test your new restrictions on local administrators
1. On CLIENT1, in Administrator: Command Prompt, run gpupdate /force. Wait until the command finishes.
2. In the Windows Firewall with Advanced Security snap-in, in the list of Outbound Rules, right-click A Test Rule, and then click Enable Rule.
3. In Administrator: Command Prompt, run ping dc1.
The ping command works even though A Test Rule appears to be enabled. The rule is listed as enabled on the local computer, but when you set the Apply local firewall rules to No on the GPO in the previous procedure, you blocked the merging of local rules with the rules delivered in the GPO.
4. In the navigation pane of the Windows Firewall with Advanced Security snap-in, expand Monitoring, and then click Firewall to see the list of rules active on the local computer.
No rules are listed. You have not created any rules in the GPO, and no local rules are active because of the settings that you included in the GPO.
5. Before proceeding, delete your rule. In the navigation pane, click Outbound Rules. In the details pane, right-click A Test Rule, click Delete, and then click Yes on the confirmation dialog box.
6. Leave both Administrator: Command Prompt and the Windows Firewall with Advanced Security snap-in open.
Step 6: Configuring the Rest of Your Client Computer Firewall
Settings
At this point, you have the firewall enabled, and a local administrator cannot disable it. In this step, you complete the configuration of the client computer GPO by adding other frequently used settings to further control the behavior of the firewall on a computer that is running Windows Vista.
Any settings in the GPO that you leave on the default value of “Not configured” can be configured by a local administrator. Therefore, you might not want to depend on the default settings. Instead, you should explicitly set those values that you want configured a certain way. The procedures in this section illustrate how to configure other common settings that you typically do not want a
local administrator to be able to change.
![]()
To see that a local administrator can modify settings that are not enforced by a GPO
1. On CLIENT1, in the Windows Firewall with Advanced Security snap-in, in the navigation pane, right-click the top node Windows Firewall with Advanced Security, and then click Properties.
2. On the Domain Profile tab, change Outbound connections to Block, and then click OK.
3. In Administrator: Command Prompt, type ping dc1, and then press ENTER.
Notice that the command fails, because all outgoing network traffic is blocked by Windows Firewall with Advanced Security.
4. In the Windows Firewall with Advanced Security snap-in, right-click the top Windows Firewall with Advanced Security node, and then click Properties.
5. Change Outbound connections back to Allow (default) to restore regular operation,
and then click OK.
In the next procedure, you configure the settings in Group Policy so that a local administrator cannot change or disable them.
![]()
To configure other common firewall settings in Group Policy
1. On MBRSVR1, in the Group Policy Management Editor, right-click Windows Firewall with Advanced Security – LDAP://cn={GUID},cn=policies,cn=system,DC=contoso,DC=com, and then click Properties.
2. On the Domain Profile tab, in the State section, set Inbound connections to Block (default), and set Outbound connections to Allow (default). This is, of course, the same behavior to which the client is already set, but setting it in the GPO prevents local administrators from changing the settings.
3. Click OK to save your settings and return to the Group Policy Management Editor.
In the next procedure, you refresh Group Policy on the client, and confirm that locally defined rules and settings cannot block network communications.
![]()
To test your new restrictions on local administrators
1. On CLIENT1, in Administrator: Command Prompt, type gpupdate /force, and then press ENTER. Wait until the command finishes.
2. In the navigation pane of the Windows Firewall with Advanced Security snap-in, right- click the top Windows Firewall with Advanced Security node, and then click Properties.
3. On the Domain Profile tab, notice that the restrictions now prevent a local user, even an administrator, from modifying the settings.
![]()
Note
The Inbound connection setting enables you to Block all connections. This is a security feature to support a quick mitigation of a malware threat, and cannot be blocked by Group Policy.
4. In the Settings section, click Customize, and then notice that the settings that you configured in Group Policy cannot be locally changed.
5. Click Cancel two times to return to the Windows Firewall with Advanced Security snap-in.
6. Close the Windows Firewall with Advanced Security snap-in.
Step 7: Creating WMI and Group Filters
When the network includes client computers that run a variety of Windows operating systems, two computers in the same OU might require different settings to achieve the same configuration. For example, a computer that is running Windows XP might require a different setting than a computer that is running Windows Vista. Two GPOs would be required in that case, one to apply to computers that are running Windows XP, and one to apply to computers that are running Windows Vista. There are two frequently used techniques used to ensure that GPOs only apply to the correct computers:
• Add a Windows Management Instrumentation (WMI) filter to the GPO. A WMI filter enables you to specify criteria that must be matched before the linked GPO is applied to a computer. By letting you filter the computers to which the settings apply, this reduces the need to further subdivide your OUs in Active Directory.
• Grant or deny the Apply Policy security permission in the access control list (ACL) for the GPO. If you put your computers in security groups, you can then deny the Apply Policy permission to the groups that should not use the GPO.
![]()
Important
Windows XP and Windows Server 2003 use different tools and produce different firewall and IPsec settings than the Windows Firewall with Advanced Security tool included with Windows Vista and Windows Server 2008. Mixing the settings together on the same computer can cause unexpected connectivity problems that are very difficult to troubleshoot. We recommend that you use the Windows Firewall with Advanced Security snap-in for settings to create the GPOs for computers that are running Windows Vista or Windows Server 2008, and use the tools provided in Windows XP or Windows Server 2003 to create the GPOs intended for those operating systems.
In this step, you apply and test a WMI filter that restricts a GPO to applying only to computers that are running Windows Vista.
![]()
To create a WMI filter that does not apply to the client
1. On MBRSVR1, switch to Group Policy Management.
2. In the navigation pane, right-click WMI Filters, and then click New.
3. In the Name box, type Apply only to Windows XP.
4. Click Add.
5. In the Query box type:
select * from Win32_OperatingSystem where Version like “5.1%”
6. Click OK, and then click Save.
7. Under Group Policy Objects, click Firewall Settings for Vista Clients.
8. Click the Scope tab, and under WMI Filtering, select your filter Apply Only to Windows XP from the list.
9. In the confirmation dialog box, click Yes.
The policy now only applies to computers that are running a Windows operating system reporting a version number that starts with the characters”5.1″. Because Windows Vista is version 6.0, the policy does not apply to that operating system.
10. Leave the Group Policy Management MMC snap-in running.
In the next procedure, you deploy the GPO to see that it no longer applies to the client computer that is running Windows Vista.
![]()
To deploy and test your ‘bad’ WMI filter
1. On CLIENT1, in Administrator: Command Prompt, run gpupdate /force. Wait for the command to finish.
2. If it is still open close and then restart the Windows Firewall with Advanced Security snap-in.
3. In the navigation pane, right-click Windows Firewall with Advanced Security on Local Computer, and then click Properties.
4. Note that all the controls in the user interface are now enabled, and no longer locked by policy because the GPO no longer applies to this computer.
5. Click OK.
6. Close the Windows Firewall with Advanced Security snap-in. Leave Administrator: Command Prompt running.
In the next procedure, you fix the WMI filter so that it correctly applies the GPO to Windows Vista.
![]()
To fix the GPO
1. On MBRSVR1, in Group Policy Management, in the navigation pane, expand WMI Filters.
2. Right-click Apply Only to Windows XP, and then click Rename.
3. Change the XP to Vista, and then press ENTER.
4. Right-click Apply Only to Windows Vista, and then click Edit.
5. Select your query, and then click Edit to display the WMI Query dialog box.
6. Change the version number so that the query reads:
select * from Win32_OperatingSystem where Version like “6.0%”
7. Click OK, and then Save.
The setting now only applies to computers that are running a Windows operating system reporting a version number that starts with 6.0, such as Windows Vista or Windows Server 2008.
8. Leave the Group Policy Management snap-in running.
In the next procedure, you deploy the policy to see that it now does apply to the client computer that is running Windows Vista.
![]()
To deploy and test your fixed WMI filter
1. On CLIENT1, in Administrator: Command Prompt, run gpupdate /force. Wait for the command to finish.
2. Open the Windows Firewall with Advanced Security snap-in.
3. In the navigation pane, right-click Windows Firewall with Advanced Security on Local Computer, and then click Properties.
Notice that many of the controls in the user interface are now disabled because the GPO is re-applied to this computer.
4. Click OK.
5. Leave Administrator: Command Prompt and the Windows Firewall with Advanced Security snap-in open.
In the next several procedures, you test group filtering with security ACLs.
![]()
To create the computer group
1. On DC1, if the Active Directory Users and Computers snap-in is not open, open it.
Click click Start, click Administrative Tools, and then click Active Directory Users and Computers.
2. In the navigation pane, right-click Computers, click New, and then click Group.
3. In Group name, type Windows Vista Computers, and then click OK.
In the next procedure, you set the permissions on the GPO to grant the apply policy permission only to members of your new computer group.
![]()
To set ACL permissions on the GPO
1. On MBRSVR1, in Group Policy Management, expand Group Policy Objects, and then click Firewall Settings for Vista Clients.
2. On the Scope tab, in the Security Filtering section, click Authenticated Users, and then click Remove.
3. Click Add, type Windows Vista Computers, and then click OK.
Your computer is not yet a member of this new group. Verify that the GPO does not apply.
![]()
To verify that the GPO no longer applies to CLIENT1
1. On CLIENT1, open an Administrator: Command Prompt, and then run gpupdate /force. Wait for the command to finish.
2. Type gpresult /r /scope computer. Examine the Applied Group Policy Objects section and verify that the only GPO listed is Default Domain Policy.
3. Look down several more lines under The following GPOs were not applied because they were filtered out for an entry for Firewall Settings for Vista Clients.
4. If it is still open, close the Windows Firewall with Advanced Security snap-in, and then restart it.
5. In the navigation pane, right-click Windows Firewall with Advanced Security on Local Computer, and then click Properties.
6. Confirm that all the controls are enabled again because the GPO no longer applies.
7. Click Cancel to close the Properties page.
In the next procedure, you add the computer to the new group.
![]()
To add CLIENT1 to the group
1. On DC1, in the Active Directory Users and Computers snap-in, select the Computers container, and then double-click Windows Vista Computers in the details pane.
2. Select the Members tab, and then click Add.
3. Click Object Types.
4. Clear all check boxes except Computers, and then click OK.
5. In the text box, type CLIENT1, and then click OK two times to save your changes. Finally, you can apply the GPO to your computer to see the results.
![]()
To apply the GPO applied to the computer
1. On CLIENT1, restart the computer. The changes to the group membership must be refreshed in the local computer’s security tokens. This occurs when the computer starts.
2. Log on as contoso/admin1.
3. Open an Administrator: Command Prompt, and run gpresult /r /scope computer.
4. Examine the output to confirm that the GPO is applied to your computer again.
5. Open the Windows Firewall with Advanced Security snap-in.
6. In the navigation pane, right-click Windows Firewall with Advanced Security on Local Computer, and then click Properties.
7. Confirm that some of the controls are disabled again because they are now controlled by Group Policy.
8. Click Cancel to close the Properties page.
For more information about how to use WMI filters and Group Policy, see:
• HOWTO: Leverage Group Policies with W MI Filters
Step 8: Enabling Firewall Logging
When you create or modify firewall rules, you can sometimes end up with a rule set that allows traffic that you do not want, or that blocks traffic that you require. To help troubleshoot these types of problems, Windows Firewall with Advanced Security can create a log file that contains entries for network connections that are permitted and network connections that are blocked.
In this step, you configure your server GPO to create a log file and to log both allowed packets and dropped packets. In the next section, after you create and test some firewall rules, you examine this log file to see the kinds of entries created there.
![]()
To configure a firewall log file in your server GPO
1. On MBRSVR1, in Group Policy Management, in the navigation pane, right-click
Firewall Settings for WS2008 Servers, and then click Edit.
2. In the Group Policy Management Editor, right-click the top node in the navigation pane, and then click Properties.
3. Select the Disable User Configuration settings check box.
4. In the confirmation dialog box, click Yes, and then click OK.
5. In the navigation pane, expand Computer Configuration, expand Windows Settings, expand Security Settings, and then expand Windows Firewall with Advanced Security.
6. Right-click Windows Firewall with Advanced Security – LDAP://cn={GUID},cn=policies,cn=system,DC=contoso,DC=com, and then click Properties.
7. On the Domain Profile tab, in the Logging section, click Customize.
8. Clear both Not configured check boxes. You can use the default values for path and maximum size.
9. Change Log dropped packets to Yes.
10. Change Log successful connections to Yes.
11. Click OK two times to save your GPO.
12. Close the Group Policy Management Editor.
After this GPO is applied to MBRSVR1, the firewall starts logging both dropped packets and successful connections. You view the log in a later section.
Creating Rules that Allow Required Inbound Network Traffic
By default, Windows Firewall with Advanced Security blocks all unsolicited inbound network
traffic. To enable programs that depend on such traffic to run correctly, you must create rules with specified criteria.
Steps for creating rules that allow required inbound network traffic
In this section of the guide, you create firewall rules that allow specific types of unsolicited inbound network traffic through the firewall.
Step 1: Configuring Predefined Rules by Using Group Policy
Step 2: Allowing Unsolicited Inbound Network Traffic for a Specific Program
Step 3: Allowing Inbound Traffic to a Specific TCP or UDP Port
Step 4: Allowing Inbound Network Traffic that Uses Dynamic RPCStep 5: Viewing the Firewall Log
Step 1: Configuring Predefined Rules by Using Group Policy In many scenarios, you might want to configure rules that allow generally required network activity. Many common network traffic types are already specified in Windows Firewall with
Advanced Security by predefined sets of rules. This makes it easy to select them for configuration and deployment.
In this step, you use the Group Policy Management MMC snap-in to configure a group of firewall rules. You set the rules that are part of the group Core Networking to be always enabled.
![]()
To configure a group of firewall rules
1. On MBRSVR1, in the Group Policy Management snap-in, right-click Firewall Settings for Vista Clients, and then click Edit.
2. In the navigation pane of the Group Policy Management Editor, expand Computer Configuration, expand Windows Settings, expand Security Settings, expand Windows Firewall with Advanced Security, and then expand Windows Firewall with Advanced Security – LDAP://{GUID},cn=policies,cn=system,DC=contoso,DC=com.
3. Click Inbound Rules.
There are no inbound firewall rules in the GPO by default.
4. Right-click Inbound Rules, and then click New rule.
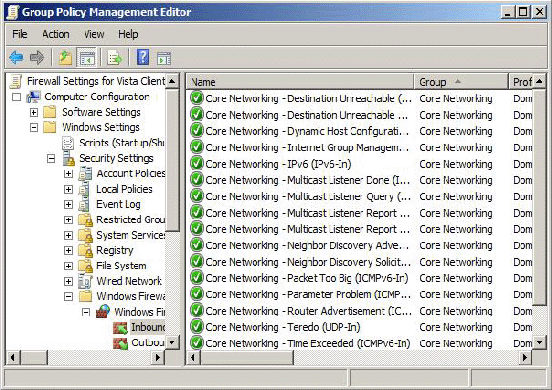
5. On the Rule Type page of the wizard, click Predefined, select Core Networking from the list, and then click Next.
6. On the Predefined Rules page, examine the list of rules, leave them all selected, and then click Next.
![]()
Note
In a production environment, carefully consider which profiles you apply the rules to. You may want to consider rules for other profiles to control how the firewall works on computers that are away from the network, such as portable computers which are taken home. You might want to consider applying your rules to all the profiles to ensure that your organization’s computers continue to be protected when they are away from the organization’s network. Some rule modifications may be required to allow expected program behavior on a home or public network that is different from the organization’s network.
7. On the Action page, because we want to create an exception for traffic that would by default be blocked, select Allow the connection, and then click Finish.
The list of enabled rules now appears in the details pane for Inbound Rules.
With the list of rules now in the GPO, deploy the GPO to the client computer.
![]()
To test the rules on the client computer
1. On CLIENT1, in Administrator: Command Prompt, run gpupdate /force. Wait until the command finishes.
2. In the navigation pane of the Windows Firewall with Advanced Security snap-in, expand Monitoring, and then click Firewall.
Note the list of rules that is now active on the local computer.
3. Click View, and then click Add/Remove columns.
4. If the Rule Source column is not displayed, click Rule Source in the Available columns list, and then click Add.
5. Click Move Up to position Rule Source directly after Name, and then click OK.
![]()
Note
Adding the Rule Source column is useful in troubleshooting scenarios, but it can make the listing of the rules slower. We recommend that you remove the column from the view when you do not need it.
6. Note that all the rules identify the GPO Firewall Settings for Vista Clients as the source of the rule. Even if you disable the locally defined Core Networking rules under Inbound Rules, these rules from the GPO still apply to the computer.
7. Close the Group Policy Management Editor for the client GPO.
Step 2: Allowing Unsolicited Inbound Network Traffic for a Specific Program
When you use a program that must be able to receive unsolicited inbound network traffic, you must create a rule to permit that traffic to pass through the firewall.
By default on Windows Vista, when you start such a program and it registers with Windows to listen on a specific TCP or UDP port number, Windows blocks the request and displays a dialog box asking for your instructions. If you choose to allow the program, then Windows automatically creates a firewall rule to allow all network traffic for that program. You can also create a similar rule manually. If you create such a rule and distribute it by using Group Policy, then users do not have to see the dialog box and decide what to do.
By default on computers running Windows Server 2008, the notification dialog box does not appear, and the program is silently blocked. So on computers running Windows Server 2008 you must create rules for each program that requires unsolicited inbound network traffic. Another advantage to creating the rule manually is that you can restrict the rule to only the specific traffic required by the program.
In this section, as a first example, you create a firewall rule that allows inbound traffic for the Telnet service through the firewall, and then you deploy that rule to MBRSVR1 by using Group Policy.
![]()
To create a firewall rule that allows inbound traffic for a program
1. On MBRSVR1, in the Group Policy Management window, right-click Firewall Settings for WS2008 Servers, and then click Edit.
2. In the navigation pane, expand Computer Configuration, expand Windows Settings, expand Security Settings, expand Windows Firewall with Advanced Security, and then expand Windows Firewall with Advanced Security – LDAP://cn={GUID},cn=policies,cn=system,DC=contoso,dc=com.
3. Right-click Inbound Rules, and then click New rule.
4. On the Rule Type page, click Custom, and then click Next.
![]()
Note
We recommend that you create rules that are as specific as possible. That means you may want to specify both the program, to ensure the rule only allows traffic when that program is running, and the port, to ensure that the program can only receive on the desired port number. To see all the options in the wizard, use the Custom rule type.
5. In the text box for This program path, type %systemroot%\system32\tlntsvr.exe.
6. Because programs can host multiple services, we recommend that you also limit the rule to the specific service you want. Next to Services, click Customize.
7. Click Apply to this service, select Telnet, click OK, and then click Next.
![]()
Note
The list of services includes only the services currently installed on the computer on which you are editing the GPO. If the service you want to specify is not installed on this computer, you can use the option Apply to service with this service short name, and then type the service name in the text box. To discover the service short name, use the Services MMC snap-in on a computer on which the service is installed.
8. On the Protocols and Ports page, click Next. You restrict the rule to a specific port in the next section.
9. On the Scope page, click Next.
10. On the Action page, click Allow the Connection, and then click Next.
11. On the Profile page, clear the Private and Public check boxes. Confirm that Domain is selected, and then click Next.
12. On the Name page, type Allow Inbound Telnet, and then click Finish.
Before you deploy the GPO, configure some other settings to ensure that local rules cannot interfere with your domain provided rule.
![]()
To finish configuring the firewall rule for the member server
1. In the navigation pane of the Group Policy Management Editor, right-click Windows Firewall with Advanced Security – LDAP://cn={GUID},cn=policies,cn=system,DC=contoso,dc=com, and then click Properties.
2. Set Firewall state to On (recommended).
3. Set Inbound connections to Block (default).
4. Set Outbound connections to Allow (default).
5. In the Settings section, click Customize.
6. Set Display a notification to No.
7. Set Apply local firewall rules to No.
8. Set Apply local connection security rules to No.
9. Click OK two times to save your GPO.
In this procedure, you deploy your GPO to your member server.
![]()
To deploy the GPO to the member server
1. Switch to the Group Policy Management snap-in, right-click MyMemberServers, and then click Link an existing GPO.
2. In the Select GPO dialog box, click Firewall Settings for WS2008 Servers, and then click OK.
The GPO is now assigned.
3. Open Administrator: Command Prompt, and then run gpupdate /force. Wait for the command to finish.
4. Open the Windows Firewall with Advanced Security snap-in.
5. In the navigation pane, expand Monitoring, and then click Firewall. Note that the only currently active rule is the Allow Inbound Telnet rule that you created in the GPO.
In this procedure, you test the deployed firewall rule.
![]()
To test the Telnet firewall rule
1. On CLIENT1, at Administrator: Command Prompt, type telnet mbrsvr1, and then press ENTER.
After several seconds the following screen appears and indicates that your Telnet firewall rule is working.

2. Close the Telnet session by typing exit, and then pressing ENTER.
In this procedure, you confirm that it is not the local Telnet rule that was created when the Telnet Server service was installed on MBRSVR1. You disable that rule and confirm that Telnet still works because your GPO applied rule is active.
![]()
To confirm that it is your GPO rule that allows Telnet to work
1. On MBRSVR1, in the Windows Firewall with Advanced Security snap-in, in the navigation pane, click Inbound Rules. Note your GPO-based Telnet firewall rule is listed at the top.
2. Scroll down to the rule named Telnet Server, right-click it, and then click Disable rule.
3. On CLIENT1, at the command prompt, run telnet mbrsvr1 again, and then confirm that it is still working.
4. Close the Telnet session by typing exit, and then pressing ENTER.
Finally, you demonstrate that the Telnet service can listen for network traffic on any port the way the rule is currently configured.
![]()
To show that the firewall rule allows Telnet network traffic on a specified port
1. On MBRSVR1, at an Administrator: Command Prompt, type tlntadmn config port=25, and then press ENTER. This configures your Telnet server to listen on port 25 instead of the default port 23.
2. On CLIENT1, at a command prompt, type telnet mbrsvr1 25. This instructs the client to use port 25 for its connection instead of the default port 23.
The connection succeeds.
In the next section, you configure the rule to allow traffic only on a port number you specify.
Step 3: Allowing Inbound Traffic to a Specific TCP or UDP Port
In the previous step, you created a rule that allows unsolicited inbound network traffic only to the Telnet Server service. However, it is considered a best practice to also limit the traffic to the TCP and/or UDP ports that the service really needs. In the case of Telnet, only TCP port 23 is required.
In this procedure, you refine the Telnet exception rule to limit the allowed inbound network traffic only to TCP port 23.
![]()
To configure the rule to limit traffic to a specific port
1. On MBRSVR1, in Group Policy Management Editor for your server GPO, click Inbound Rules.
2. In the details pane, right-click Allow Inbound Telnet, and then click Properties.
3. Click the Protocols and Ports tab.
4. In Protocol type, click TCP. Note the Protocol number automatically changes to 6.
5. In the Local port list, click Specific Ports.
6. In the text box directly under Local Port, type 23.
7. Click OK to save your changes.
In this procedure, you test the modified rule.
![]()
To test your modified rule
1. On MBRSVR1, at Administrator: Command Prompt, run gpupdate /force. Wait until the command finishes.
The Telnet service on MBRSVR1 is still configured to listen on port 25.
2. On CLIENT1, at a command prompt, run telnet mbrsvr1 25.
The command times out and fails because the firewall on MBRSVR1 now blocks all inbound traffic to the Telnet service except port 23.
3. On MBRSVR1, at the Administrator: Command Prompt, run tlntadmn config port=23
to restore the service to the default port number.
4. On CLIENT1, at the command prompt, run telnet mbrsvr1.
The command succeeds because the firewall allows inbound network traffic to port 23 to the Telnet service.
5. Close the Telnet session by typing exit, and then pressing ENTER.
Step 4: Allowing Inbound Network Traffic that Uses Dynamic
RPC
Many programs use the RPC protocol to request communications with a host service on a dynamically assigned port number. To do this, the remote client connects to the server on TCP port 135 (the “well-known” port number for RPC), and identifies the service to which it wants to connect. The RPC Endpoint Mapper service which is listening on that port, replies with the port number that the client should use to connect to the desired service.
In earlier versions of Windows, dynamically assigned ports have been a challenge for firewall administrators. Either they had to create rules to open large ranges of port numbers in the dynamically assigned range (all ports greater than 1024), or they had to limit the program to using a much smaller number of ports than it was designed to use. Creating rules to open many ports that are not currently being actively used increases the surface area of a computer’s vulnerability to attack. Limiting programs to using fewer ports might compromise the programs’ performance. Neither situation is a good solution.
![]()
Note
To determine whether your program must use ports that are dynamically assigned by RPC, see the documentation provided by your program’s vendor. Alternatively, you can examine the traffic going to and from your program by using a network protocol analyzer such as Microsoft Network Monitor. You can download Network Monitor at http://go.microsoft.com/fwlink/?LinkID=94770.
In Windows Vista and Windows Server 2008, this problem is solved by the introduction of rules that can directly support RPC port requirements for programs. To configure this support for a program you must create the following rules:
• An inbound rule that allows inbound network traffic for RPC Endpoint Mapper service. This rule allows the computer to receive traffic sent to the port 135. The rule must also be configured to use the allow action, and the program path of the RPC Endpoint Mapper service.
• An inbound rule that specifies Dynamic RPC for the port number. When an incoming request from a remote computer is received by the RPC Endpoint Mapper service on port 135 (see the previous rule), the service assigns a dynamic port number to the request and replies to the remote computer by using that number. The IP address of the remote computer and the dynamic port number are stored in an internal table. When the remote computer then sends a packet to the new port number, this rule allows Windows to match the port number and IP address to the entries stored in the table. If a match is found, it allows the inbound traffic.
The advantage is that any port in the RPC ephemeral range can be used without having to explicitly define a rule to open that port. The port is only usable by a program that was assigned the use of the port by the endpoint mapper. No unused ports are left open, reducing the vulnerability of the server.
In this section, you create rules for the Remote Event Log service that use Dynamic RPC. Although Windows Vista and Windows Server 2008 have predefined rules that provide this capability, you create the rules manually to see the steps involved.
To begin, confirm that the Remote Event Log service is not currently working remotely from the client because the firewall on MBRSVR1 is blocking the traffic.
![]()
To confirm that the Remote Event Log service is not working remotely
1. On CLIENT1, click Start, type event viewer in the Start Search box, and then press ENTER.
2. Click Action, and then click Connect to another computer.
3. In the Another computer text box, type MBRSVR1, and then click OK.
4. After several seconds, the connection attempt fails as shown in the following figure, because Windows Firewall with Advanced Security on MBRSVR1 is blocking the required network traffic. Click OK.

To allow this service to work, begin by creating a rule that supports inbound traffic to the RPC Endpoint Mapper service.
![]()
To create a rule that allows inbound network traffic to the RPC Endpoint Mapper service
1. On MBRSVR1, in Group Policy Management Editor for your server GPO, in the navigation pane, right-click Inbound Rules, and then click New rule.
2. On the Rule Type page, click Custom, and then click Next.
3. In the This program path text box, type %systemroot%\system32\svchost.exe.
4. Next to Services, click Customize.
5. Click Apply to this service, select Remote Procedure Call (RPC) with a short name of RpcSs, click OK, and then click Next.
6. On the warning about conflicting with Windows service-hardening rules, click Yes.
7. On the Protocol and Ports page, for Protocol type, select TCP.
8. For Local Port, select RPC Endpoint Mapper, and then click Next.
9. On the Scope page, click Next.
10. On the Action page, click Next.
11. On the Profile page, clear the Private and Public check boxes, and then click Next.
12. On the Name page, type Allow RPC Endpoint Mapper, and then click Finish.
Next, create a rule that allows the incoming traffic from the remote Event Log client. Since the incoming port number is assigned dynamically by the RPC Endpoint Mapper service, you specify Dynamic RPC instead of a specific port number.
![]()
Note
The Event Log we are using as an example service is hosted in %systemroot%\system32\svchost.exe. Be sure to use the path of the executable file hosting the service that you want to create rules for when in a production environment.
![]()
To create a rule that allows inbound network traffic to your RPC-enabled service
1. On MBRSVR1, in Group Policy Management Editor, in the navigation pane, right-click Inbound Rules, and then click New rule.
2. On the Rule Type page, click Custom, and then click Next.
3. In the This program path text box, type %systemroot%\system32\svchost.exe. The Remote Event Log service is another service hosted by that file.
4. Next to Services, click Customize.
5. Click Apply to this service, select Windows Event Log with a short name of Eventlog, click OK, and then click Next.
6. On the warning about conflicting with Windows service-hardening rules, click Yes.
7. On the Protocol and Ports page, for Protocol type, select TCP.
8. For Local Port, select Dynamic RPC, and then click Next.
9. On the Scope page, click Next.
10. On the Action page, click Next.
11. On the Profile page, clear the Private and Public check boxes, and then click Next.
12. On the Name page, type Allow Remote Event Log Service, and then click Finish.
Now you can apply the GPO to MBRSVR1.
13. At an Administrator: Command Prompt, run gpupdate /force. Wait for the command to finish.
14. If it is not already open, open the Windows Firewall with Advanced Security snap-in.
15. Expand Monitoring, click Firewall, and then confirm that your new rules are now active on the computer.
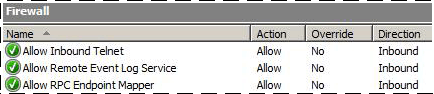
Now you can try to connect to the Remote Event Log service from the client again.
![]()
To confirm that the Remote Event Log service is working
1. On CLIENT1, in Event Viewer, click Action, and then click Connect to another computer.
2. In the Another computer text box, type MBRSVR1, and then click OK.
3. The attempt succeeds, and the top node in the navigation page shows that the viewer is connected to MBRSVR1.contoso.com.

4. Close Event Viewer.
Step 5: Viewing the Firewall Log
You have created several connections to your server after turning on firewall logging, and you also had several connections blocked by the firewall rules you put in place. In this step you examine the log that accumulated to this point and then you turn the logging back off.
![]()
To examine the firewall log
1. On MBRSVR1, if it is not already open, open the Windows Firewall with Advanced Security snap-in.
2. In the navigation pane, click Monitoring. In the Logging Settings section, click the file path next to File name. The log opens in Notepad.
3. In Notepad, examine the entries. There are many more entries than those related directly to your activity for this guide. There are Domain Name System (DNS) queries, network basic input/output (NetBIOS) protocol connections, and so on.
4. Search for lines that resemble the following examples. You can press CTRL-F to open a search dialog box, and enter a [space] 23 [space]. Be sure to include the spaces, so that you do not find the number 23 embedded in other numbers.
The values in italic in the samples that follow might vary from those in your log. The final column is not shown here, but is often of interest, because it shows whether the packet was an inbound (RECEIVE) or outbound (SEND) packet.
• The following entries represent the allowed Telnet connections on ports 23 and 25:
2007-07-18 10:10:48 ALLOW TCP 192.168.0.101 192.168.0.100 52174 23
2007-07-18 10:15:54 ALLOW TCP 192.168.0.101 192.168.0.100 52175 25
• The following entry represents a blocked Telnet connection attempt on port 25:
2007-07-18 10:28:28DROP TCP 192.168.0.101 192.168.0.100 52180 25
• The following entries shows the allowed Remote Event Log connection:
2007-07-18 10:49:59 ALLOW TCP 192.168.0.101 192.168.0.100 52191 135
2007-07-18 10:50:00 ALLOW TCP 192.168.0.101 192.168.0.100 52192 49153
5. Close Notepad.
![]()
Note
In production troubleshooting scenarios, you can import your log file into Microsoft Excel to more easily search, sort, and filter the entries. Use the space character as the separator when you import the log file.
You should only turn on logging when you need it, such as when you are troubleshooting. Because we are finished, turn the logging off.
![]()
To turn Firewall logging off
1. Switch to the Group Policy Management Editor window that is configuring your Server GPO.
2. In the navigation pane, right-click Windows Firewall with Advanced Security – LDAP://cn={GUID},cn=policies,cn=system,DC=contoso,DC=com, and then click Properties.
3. On the Domain Profile tab, under Logging, click Customize.
4. Change Log dropped packets to No (default).
5. Change Log successful connections to No (default).
6. Click OK two times to save your changes.
7. At the Administrator: Command Prompt, run gpupdate /force. Wait until the command is finished.
Creating Rules that Block Unwanted Outbound Network Traffic
By default, Windows Firewall with Advanced Security allows all outbound network traffic. If your organization prohibits specific network programs on organization computers, you can help enforce that prohibition by blocking the network traffic that the programs require to operate correctly.
By default, inbound network traffic to a computer that does not match a rule is blocked, but nothing prevents outbound traffic from leaving a computer. To block the network traffic for prohibited programs, you must create an outbound rule that blocks traffic with specific criteria from passing through Windows Firewall with Advanced Security.
Steps for creating rules that block prohibited outbound network traffic
In this section of the guide, you create firewall rules that block specific types of outbound network traffic at Windows Firewall with Advanced Security. You use Telnet as the sample program to be blocked.
Step 1: Blocking Network Traffic for a Program by Using an Outbound Rule
Step 2: Deploying and Testing Your Outbound Rule
Step 1: Blocking Network Traffic for a Program by Using an Outbound Rule
In this step, you create a rule for CLIENT1 to block all outbound traffic on TCP port 23. You can create a rule for a specific program path and name, but because it is easy to rename an executable and bypass that restriction, it is typically more effective to block the ports for the network traffic that the program requires to work.
![]()
Caution
Blocking the ports needed by a program prevents any program that uses those ports from communicating on the network. Make sure that no program that the users require use the same ports.
![]()
To create an outbound block rule
1. On MBRSVR1, if Group Policy Management Editor is still open, close it.
2. In Group Policy Management, right-click Firewall Settings for Vista Clients, and then click Edit.
3. Expand Computer Configuration, expand Windows Settings, expand Security Settings, expand Windows Firewall with Advanced Security, and then expand Windows Firewall with Advanced Security – LDAP://{GUID},cn=policies,cn=system,DC=contoso,DC=com.
4. Click Outbound Rules, and then notice that no rules are currently defined.
5. Right-click Outbound Rules, and then click New Rule.
6. On the Rule Type page, click Custom, and then click Next.
![]()
Note
If you select the Port rule type, you can only specify the local port number to block. We want to block remote port 23. Therefore, specify the Custom rule type.
7. On the Program page, click All programs, and then click Next.
8. On the Protocol and Ports page, change the Protocol type to TCP.
9. In the Remote ports list, click Specific Ports, type 23 in the text box, and then click
Next.
![]()
Note
Be sure to specify the Remote port, not Local. This differs from the inbound rules you set earlier, because this rule applies to the client instead of the server.
10. On the Scope page, click Next.
11. On the Action page, click Block the connection, and then click Next.
12. On the Profile page, clear the Private and Public check boxes, and then click Next.
13. On the Name page, type Block Outbound Telnet, and then click Finish.
Step 2: Deploying and Testing Your Outbound Rule
Now that you have the rule created, deploy it to CLIENT1 and test it.
![]()
To deploy and test your outbound block rule
1. On CLIENT1, at an Administrator: Command Prompt, run gpupdate /force. Wait until the command has finished.
2. Run telnet mbrsvr1.
3. The connection fails as shown in the following message:
Connecting to mbrsvr1…Could not open connection to the host, on port 23: Connect failed
4. For the next section, you must use Telnet again, so disable the rule. On MBRSVR1, in Group Policy Management Editor, right-click the rule Block Outbound Telnet, and then click Disable Rule.
5. On CLIENT1, repeat steps 1 and 2 to confirm that Telnet is working again.
6. Type exit and the press ENTER to end the Telnet session.
Deploying a Basic Domain Isolation Policy
By using Windows Firewall with Advanced Security in Windows Vista and Windows Server 2008, you can create connection security rules that specify that traffic must be secured by one or more of the features of IPsec. In domain isolation you use authentication to require each computer involved in a connection to positively establish the identity of the other computer.
By creating rules that require authentication by a domain member, you effectively isolate those domain-member computers from computers that are not part of the domain.
Most networks contain computers that cannot participate in domain isolation because they cannot use IPsec. This can be due to the network services they host, the operating systems they run, or other reasons. If you implement domain isolation, you must create inbound exemption rules for these computers that cannot use IPsec, if you want them to communicate with the computers that require IPsec.
For outbound connections, most of the domain isolation scenarios use the option to request but not require IPsec protection. This enables the computers to protect traffic when communicating with computers than can also use IPsec, but fall back to plaintext after three seconds of trying IPsec when communicating with computers that cannot use IPsec. However, some services have response time-outs that are less than three seconds, which causes them to fail. In earlier versions of Windows this meant that you had to create (sometimes a very large number of) outbound exemption rules to support those servers or services that cannot authenticate. To address this problem, Microsoft released the Simple Policy Update for Windows Server 2003 and Windows XP. This update reduces the delay for attempts between IPsec-protected clients and non-IPsec-protected clients to one-half second. For more information about the Simple Policy Update for Windows Server 2003 and Windows XP, see Simplifying IPsec Policy with the SimplePolicy Update at http://go.microsoft.com/fwlink/?LinkID=94767.
When you use request mode in Windows Vista and Windows Server 2008, Windows sends both connection attempts at the same time. If the remote host responds with IPsec, the non-IPsec attempt is abandoned. If the IPsec request generates no response, the non-IPsec attempt can continue.
This reduced delay solves the time-out failure problem for most programs. However, there might still be times when you want to ensure that your computers do not use IPsec to try to talk to certain hosts on the network. In those circumstances, create exemption rules for the clients and they no longer use IPsec to communicate with computers on the exemption list.
For more information about domain isolation, see “Introduction to Server and Domain Isolation and Domain Isolation with Microsoft Windows Explained.
Steps for creating connection security rules to enforce domain isolation
In this section, you create connection security rules that specify that the computers in your domain require authentication for inbound network traffic and request authentication for outbound traffic.
Step 1: Creating a Connection Security Rule that Requests Authentication
Step 2: Deploying and Testing Your Connection Security Rules
Step 3: Changing the Isolation Rule to Require Authentication
Step 4: Testing Isolation with a Computer That Does Not Have the Domain Isolation Rule
Step 5: Creating Exemption Rules for Computers that are Not Domain Members
Step 1: Creating a Connection Security Rule that Requests Authentication
In this step, you create connection security rules for the contoso.com domain that cause all member computers to require authentication for inbound network traffic, and request it for outbound traffic. You start by using a GPO that only requests inbound authentication, and after you confirm that it is working you revise it to require inbound authentication.
![]()
To create a new GPO for domain isolation
1. On MBRSV1, in Group Policy Management, right-click Group Policy Objects, and then click New.
2. In Name, type Domain Isolation, and then click OK.
3. In the navigation pane, right-click your new GPO, and then click Edit.
4. In Group Policy Management Editor, in the navigation pane, right-click the top node for your Domain Isolation GPO, and then click Properties.
5. Select the Disable User Configuration settings check box, because this is a computer- only GPO.
6. In the Confirm Disable dialog box, click Yes, and then click OK.
7. In the navigation pane, expand Computer Configuration, expand Windows Settings, expand Security Settings, expand Windows Firewall with Advanced Security, and then expand Windows Firewall with Advanced Security – LDAP://cn={GUID},cn=policies,cn=system,DC=contoso,DC=com.
8. Right-click Connection Security Rules, and then click New rule.
9. On the Rule Type page, click Isolation, and then click Next.
10. On the Requirements page, confirm that Request authentication for inbound and outbound connections selected, and then click Next.
![]()
Caution
In a production environment, we recommend that you set request mode first and allow the GPO to fully propagate to the network. Confirm that all your computers are communicating successfully by using IPsec before changing the rules to require mode. Setting the rule to require mode first can result in computers that cannot communicate until all the computers receive and apply the GPO. In a later step, you modify the rule to change it to require inbound authentication.
11. On the Authentication Method page, click Computer (Kerberos V5), and then click Next.
12. On the Profile page, clear the Private and Public check boxes, and then click Next.
13. On the Name page, type Request Inbound Request Outbound, and then click Finish.
Step 2: Deploying and Testing Your Connection Security Rules In this step, you deploy and test your domain isolation rule. You link the GPO that contains the rule to the OUs that contain the computer accounts, and then you test connectivity and view the IPsec security associations (SAs) that are created to support the connection.
Start by linking your GPO to the OUs that contains the computers to receive the rule.
![]()
To link your GPO to the appropriate OUs
1. On MBRSVR1, open the Group Policy Management snap-in.
2. Right-click MyClientComputers, and then click Link an Existing GPO.
3. In the Group Policy objects list, select Domain Isolation, and then click OK.
4. Right-click MyMemberServers, and then click Link an Existing GPO.
5. In the Group Policy objects list, select Domain Isolation, and then click OK.
If you browse your OUs, you see a list that resembles the following diagram:
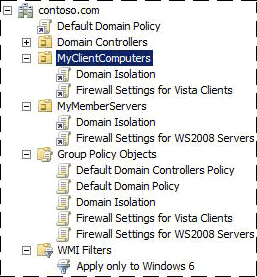
Now, ensure that both computers receive and apply the new GPO.
![]()
To test the new GPO on your computers
1. On both MBRSVR1 and CLIENT1, at an Administrator: Command Prompt, run gpupdate /force. Wait until the commands finish.
2. On CLIENT1, at the command prompt, run telnet mbrsvr1.
The connection succeeds. Do not end the Telnet session yet.
3. Open the Windows Firewall with Advanced Security snap-in.
4. Expand Monitoring, expand Security Associations, and then click Main Mode.
5. In the Main Mode pane, double-click the security association (SA) that is displayed.
6. Examine the settings, as shown in the following figure, that the local computer (CLIENT1) authenticated with the remote computer (MBRSVR1).
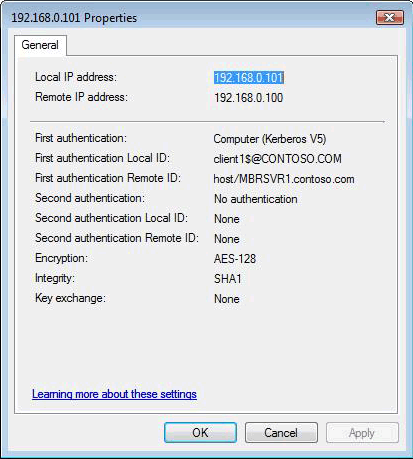
7. Click OK.
8. In the navigation pane, click Quick Mode, and then double-click the SA that is displayed.
9. Examine the settings, which show that any traffic between the two computers using any protocol is protected using the Encapsulating Security Payload (ESP) integrity algorithm Secure Hash Algorithm (SHA1). ESP integrity uses a cryptographically protected checksum to ensure that the packets that are received have not been modified after they are sent. Any packets that fail the integrity tests are silently dropped.
![]()
Note
SAs have a limited lifetime. Therefore, if you let the connection sit idle long enough, the SA can expire and be removed from the list. By sending more network traffic, the SA is renegotiated and reappears in the list.
10. Type exit at the Telnet prompt to end the Telnet session.
Step 3: Changing the Isolation Rule to Require Authentication In this step, modify the rule that you created so that authentication is required instead of requested. Clients that cannot authenticate, or that do not have a connection security rule to authenticate the traffic, cannot communicate with computers that are domain members.
![]()
To change the policy from requesting to requiring authentication
1. On MBRSVR1, switch to the Group Policy Management Editor.
2. In the details pane, right-click Request Inbound Request Outbound, and then click Properties.
3. In the Name text box, change the name to Require Inbound Request Outbound to accurately reflect its new behavior.
4. Click the Authentication tab.
5. Under Requirements, change Authentication mode to Require inbound and request outbound, and then click OK.
![]()
Note
Although using Require inbound and outbound would work for this guide, in a production environment it is usually not practical to require outbound authentication. Domain-member computers often must initiate communications with computers that are not in the domain, such as remote Web sites.
Confirm that the computers can still communicate even though authentication is required.
![]()
To test the modified GPO requiring authentication
1. On both MBRSVR1 and CLIENT1, at an Administrator: Command Prompt, run gpupdate /force.
2. On CLIENT1, at the command prompt, run telnet mbrsvr1.
The connection succeeds.
3. Type exit to end the Telnet session.
Step 4: Testing Isolation with a Computer That Does Not Have the Domain Isolation Rule
To simulate a computer that is not part of the domain, remove the GPO from CLIENT1, and try to connect again.
![]()
To remove the GPO from CLIENT1
1. On MBRSVR1, switch to Group Policy Management.
2. Under MyClientComputers, right-click Domain Isolation, and then click Link Enabled
to disable the link.
In the next procedure, you refresh the GPO on CLIENT1 and try to communicate with MBRSVR1.
![]()
To test the modified GPO on CLIENT1
1. On CLIENT1, at an Administrator: Command Prompt, run gpupdate /force. Wait until the command finishes.
2. At the command prompt, run telnet mbrsvr1. The connection fails because it never receives a reply to its request. Because MBRSVR requires authentication, and CLIENT1 cannot supply it, all incoming packets are dropped.
3. Type exit and press ENTER to end the Telnet session.
In the next procedure, you restore the GPO to the client so that the correct rule is in place for later steps.
![]()
To reapply the GPO to CLIENT1
1. On MBRSVR1, under MyClientComputers, right-click Domain Isolation, and then click Link Enabled.
2. If you want, you can repeat the previous procedure “To test the modified GPO on CLIENT1” to confirm that you can connect again. This time the connection succeeds.
Step 5: Creating Exemption Rules for Computers that are Not Domain Members
In this step, you add a rule to your domain isolation GPO to exempt all DNS servers on the network from the domain isolation authentication requirements.
![]()
Note
If the computers on the network are all running Windows Vista, Windows Server 2008, or if they can run the Simple Policy Update for Windows Server 2003 and W indows XP, then you probably do not need to add exemption rules as illustrated here. Fewer exemption rules means less complexity for your connection security and firewall rule GPOs.
![]()
To modify your domain isolation GPO to exempt DNS servers
1. On MBRSVR1, switch to the Group Policy Management Editor that has the Domain Isolation GPO open.
2. In the navigation pane, right-click Connection Security Rules, and then click New rule.
3. On the Rule Type page, click Authentication exemption, and then click Next.
4. On the Exempt Computers page, click Add.
5. In the IP Address dialog box, click Predefined set of computers.
6. Click the list to expand it, select DNS servers, and then click OK.
7. On the Exempt Computers page, click Next.
8. On the Profile page, clear the Private and Public check boxes, and then click Next.
9. On the Name page, type Exempt DNS servers from domain isolation, and then click Finish.
The new rule appears in your GPO.
![]()
Note
You can use a network traffic analyzer such as Microsoft Network Monitor to see the network packets before and after you apply this rule to confirm that IPsec attempts are not made to the DNS server after the exemption rule is applied. To download Network Monitor, see Microsoft Network Monitor.
Isolating a Server by Requiring Encryption and Group Membership
Domain isolation restricts domain-member computers to communicating only with other domain- member computers. Some servers contain sensitive data, such as personal data, medical records, or credit card data that must be guarded even more carefully. An extra layer of security, known as server isolation, restricts access to this sensitive data to only those users who have a specific business need. Often such data must also be encrypted during transmission to prevent eavesdropping.
By using Windows Firewall with Advanced Security in Windows Vista and Windows Server 2008, you can specify that specific network connections can be accessed only by specific users, based on their group membership. You can also specify that access is permitted only by specific computers based on computer account membership in a group. Both types of restriction are based on the authentication methods demonstrated in the previous section. Finally, you can also specify that these network connections are encrypted by using one of several encryption algorithms.
For more information about server isolation, see:
• Introduction to Server and Domain Isolation
• Server Isolation with Microsoft Windows Explained
Steps for creating connection security rules to enforce server isolation
In this section, you create inbound firewall rules that specify that only computers that are members of a specific group can access MBRSVR1. You also configure the rules to require encryption for all connections to the specified server.
Step 1: Creating the Security Group
Step 2: Modifying a Firewall Rule to Require Group Membership and Encryption
Step 3: Creating a Firewall Rule on the Client to Support Encryption
Step 4: Testing the Rule When CLIENT1 Is Not a Member of the Group
Step 5: Adding CLIENT1 to the Group and Testing Again
Step 1: Creating the Security Group
In this step, you create a security group in Active Directory. This group will be referenced by your firewall rule in a later step to control which computers can access the server.
![]()
To create a security group
1. On DC1, click Start, and then click Server Manager.
2. In the navigation pane, expand Roles, expand Active Directory Domain Services, expand Active Directory Users and Computers, expand contoso.com, right-click Computers, click New, and then click Group.
3. In the New Object – Group dialog box, type Access to MBRSVR1, and then click OK.
4. Leave Server Manager running with the Computers container shown in the details pane.
Do not add any computers to the group yet.
Step 2: Modifying a Firewall Rule to Require Group Membership and Encryption
In this step, you modify your Telnet firewall rule to allow Telnet traffic only from computers that are members of the security group you created in the last step.
![]()
To modify the Telnet firewall rule on MBRSVR1
1. On MBRSVR1, switch to Group Policy Management.
2. In the navigation pane, under Group Policy Objects, right-click Firewall Settings for WS2008 Servers, and then click Edit.
3. In the Group Policy Management Editor, expand Windows Settings, expand Security Settings, expand Windows Firewall with Advanced Security, expand Windows Firewall with Advanced Security – LDAP://cn={GUID},cn=policies,cn=system,DC=contoso,DC=com, and then click Inbound Rules.
4. In the details pane, right-click Allow Inbound Telnet, and then click Properties.
5. Change the name by typing Allow Encrypted Inbound Telnet to Group Members Only.
6. Click Allow only secure connections, and then click Require encryption.
7. Click the Users and Computers tab.
8. Under Authorized computers, click Only allow connections from these computers, and then click Add.
9. In the Select Computers or Groups dialog box, type Access to MBRSVR1, click
Check Names to ensure that it resolves, and then click OK.
![]()
Important
Even though this guide only demonstrates how to use a computer group, remember that you can also specify user group membership as a requirement, as long as the authentication method that is used includes user authentication as well as computer authentication. This enables you to specify that only users who are members of group X can access the protected server, and only when they
are using a computer that is a member of group Y. An authorized user that uses a non-authorized computer cannot access the protected server, nor can an authorized computer be used by a non-authorized user to access the protected server.
10. Click OK to close the Allow Inbound Telnet Properties page.
11. Close the Group Policy Management Editor.
Step 3: Creating a Firewall Rule on the Client to Support
Encryption
In this step, you create a new firewall rule that applies to the client computer so that it can successfully encrypt the connection as required by the server.
![]()
To modify the Telnet firewall rule for the client
1. On MBRSVR1, in Group Policy Management, under Group Policy Objects, right-click Firewall Settings for Vista Clients, and then click Edit.
2. In the Group Policy Management Editor, expand Windows Settings, expand Security Settings, expand Windows Firewall with Advanced Security, expand Windows Firewall with Advanced Security – LDAP://cn={GUID},cn=policies,cn=system,DC=contoso,DC=com, right-click Outbound Rules, and then click New Rule.
3. On the Rule Type page, click Custom, and then click Next.
4. On the Program page, click All Programs, and then click Next.
![]()
Note
By restricting the rule to the Telnet port number (in the next step), instead of the program name, any correctly configured Telnet client can be used. If you specify a program by path and file name then only that specific program works, and other
Telnet client programs fail. This configuration is recommended only for outbound rules. For inbound rules, we recommend that you use both a port restriction and a program restriction. That way the port is only open when the program is running. If you do not specify a program then the port remains open all the time.
5. On the Protocol and Ports page, change the Protocol type to TCP.
6. Change the Remote port list to Specific Ports, type 23 in the text box, and then click Next.
7. On the Scope page, under Which remote IP addresses does this rule match, select the These IP addresses check box. Make sure to select the remote option.
8. To the right of the Remote address section, click Add.
9. In the IP Address dialog box, type 192.168.0.100 (the IP address of MBRSVR1) in the top text box, click OK, and then click Next.
10. On the Action page, click Allow the connection if it is secure, click Require the connections to be encrypted, and then click Next.
11. On the Computers page, click Next.
12. On the Profile page, clear the Private and Public check boxes, and then click Next.
13. Name the rule Allow only encrypted Telnet to MBRSVR1, and then click Finish.
14. At an Administrator: Command Prompt, run gpupdate /force. Wait until the command finishes.
Step 4: Testing the Rule When CLIENT1 Is Not a Member of the Group
CLIENT1 has a firewall rule and a connection security rule that meet all the requirements to communicate with MBRSVR1, but CLIENT1 has not yet been added to the computer group that is referenced in the inbound Telnet firewall rule for MBRSVR1. In this step, you try to connect to both the Remote Event Viewer service and the Telnet service on MBRSVR1.
![]()
To try to connect to the Remote Event Viewer service on MBRSVR1
1. On CLIENT1, at an Administrator: Command Prompt, run gpupdate /force. Wait until the command finishes.
2. Click Start, type event viewer in the Start Search box, and then press ENTER.
3. In the navigation pane of Event Viewer, right-click the top node Event Viewer (Local), and then click Connect to another computer.
4. In the Select Computer dialog box, type MBRSVR1, and then click OK.
The attempt is successful, because the rules you created do not require group membership or encryption for the Event Viewer.
Now, to see the effect of your new rules, try to connect to MBRSVR1 using Telnet.
![]()
To try to connect to MBRSVR1 by using Telnet
• On CLIENT1, at an Administrator: Command Prompt, run telnet mbrsvr1.
The command fails because the computer is not yet a member of the Access to MBRSVR1 group, and only members of that group are permitted to send port 23 traffic through Windows Firewall with Advanced Security to that server.
Step 5: Adding CLIENT1 to the Group and Testing Again
In this step, you add CLIENT1 to the security group Access to MBRSVR1, and then verify that it enables the client to access the Telnet service again.
![]()
To add the computer to the group
1. On DC1, in the Computers container, double-click the group Access to MBRSVR1, and then click the Members tab.
2. Click Add.
3. In the Select Users, Contacts, Computers, or Groups dialog box, click Object Types.
4. Click Computers, and then click OK.
5. In the text box, type client1, and then click OK.
6. Click OK to close the group Properties page.
![]()
To test Telnet access from CLIENT1 to MBRSVR1
1. Because its group membership must be refreshed, restart CLIENT1.
2. After the computer restarts, log on as contoso\admin1.
3. Open an Administrator: Command Prompt, and then run telnet mbrsvr1.
The command works because all requirements of the rules are now satisfied. Only computers that are both a member of the domain and that authenticate as a member of the specified group can access the Telnet service on MBRSVR1.
4. Open the Windows Firewall with Advanced Security snap-in.
5. Expand Monitoring, expand Security Associations, and then click Quick Mode.
6. Double-click the SA to display its properties. There is now a protocol listed next to ESP confidentiality. That is the encryption algorithm being used by this connection.
7. Click OK, and then close Windows Firewall with Advanced Security.
8. In the Telnet window, type exit, and then press ENTER to end the Telnet session.
Creating Rules that Allow Specific Computers or Users to Bypass Firewall Block Rules
In a typical network, you want all network traffic blocked except for traffic that is truly required. By default, rules that block traffic have a higher precedence than rules that allow traffic. So if traffic coming into (or going out of) the firewall matches both an allow rule and a block rule, it will be dropped.
There are times however, when you might want to allow network traffic into a computer that is ordinarily blocked. For example, the network troubleshooting team might need to use network protocol analyzers or other network troubleshooting equipment in ways that the firewall rules would ordinarily prevent. In such circumstances, you can create a computer-specific and optionally a user-specific exception to some or all the firewall rules.
Because the IPsec authentication protocols require the exchange of computer or user credentials, the credentials can be checked against a list of computers or users in the rule to further restrict the network traffic. If you enable the Override block rules setting on the firewall rule then correctly authenticated traffic that matches this rule is permitted, even if another rule would block it. The result is a set of rules that say “this traffic is blocked unless it is coming from an authenticated computer or user who is approved.”
Steps for creating rules that allow specific computers or users to bypass the firewall
In this section of the guide, you create a firewall rule that blocks all Telnet network traffic, and
then test it with your existing Telnet allow rule you created in a previous section. Then you modify your existing Telnet allow rule to include the Override Block Rules setting, and confirm that you can connect from your approved computer.
Step 1: Adding and Testing a Firewall Rule that Blocks All Telnet Traffic
Step 2: Modifying Your Telnet Allow Rule to Override Block Rules
Step 1: Adding and Testing a Firewall Rule that Blocks All Telnet Traffic
Create a rule that blocks all Telnet traffic, and then test it by using the existing Telnet allow rule to see that the cumulative effect is to block Telnet traffic.
![]()
To create a Telnet block rule
1. On MBRSVR1, in Group Policy Management, click Group Policy Objects, right-click Firewall Settings for WS2008 Servers, and then click Edit.
2. In the Group Policy Object Editor, in the navigation pane, expand Computer Configuration, expand Windows Settings, expand Security Settings, expand Windows Firewall with Advanced Security, and then expand Windows Firewall with Advanced Security – LDAP://cn={GUID},cn=policies,cn=system,DC=contoso,DC=com.
3. Right-click Inbound Rules, and then click New Rule.
4. On the Rule Type page, click Custom, and then click Next.
5. On the Program page, click This program path, and then in the text box, type %systemroot%\system32\tlntsvr.exe.
6. Click Customize, click Apply to this service, click the row for Telnet with a short name of TlntSvr, click OK, and then click Next.
7. On the Protocol and Ports page, change the Protocol type to TCP, change Local port to Specific Ports, type 23 in the text box, and then click Next.
8. On the Scope page, click Next.
9. On the Action page, click Block the connection, and then click Next.
10. On the Profile page, clear the Private and Public check boxes, and then click Next.
11. On the Name page, type Block All Telnet, and then click Finish.
Now you have two conflicting rules. One specifies that Telnet traffic is permitted as long as it is encrypted and sent by a computer that is a member of the group Access to MBRSVR1. The other rule says to block all Telnet traffic. In the next procedure you see what Telnet connectivity is available when these two rules are both in place.
![]()
To test Telnet connectivity when two conflicting rules are in place
1. On MBRSVR1, switch to the Administrator: Command Prompt, run gpupdate /force.
Wait until the command is finished.
2. On CLIENT1, at a command prompt, type the command telnet mbrsvr1.
The command fails because, by default, the block rule has a higher precedence than the allow rule.
Step 2: Modifying Your Telnet Allow Rule to Override Block Rules
In this step, you modify your existing Telnet allow rule to include the Override Block Rule setting, and then test the behavior of Telnet with the modified rule.
![]()
To add the Override Block Rule setting to your rule
1. On MBRSVR1, in Group Policy Management Editor, click Inbound Rules.
2. Right-click Allow Encrypted Inbound Telnet to Group Members Only, and then click Properties.
3. On the General tab, in the Action section, select the Override block rules check box, and then click OK.
Now test the two conflicting rules.
![]()
To test the Telnet connectivity with your current rule configuration
1. On MBRSVR1, at an Administrator: Command Prompt, run gpupdate /force. Wait until the command is finished.
2. On CLIENT1, at a command prompt, run telnet mbrsvr1.
The command succeeds because the existing Telnet allow rule now overrides the block rule. The only traffic that can bypass the Telnet block rule is that traffic that matches the existing Telnet allow rule with the Override block rule option enabled. That rule specifies that the traffic must be authenticated, and in this case, encrypted.
3. Type exit and the press ENTER to end the Telnet session.
Summary
Windows Firewall with Advanced Security is an important element in a defense-in-depth security strategy to help secure the computers in your organization, and help mitigate against threats that either bypass your perimeter firewall or originate from within the network.
In this guide, you were introduced to the features of the new Windows Firewall with Advanced Security included with Windows Vista and Windows Server 2008:
• You used Windows Firewall with Advanced Security to set up basic inbound and outbound firewall rules.
• You created Group Policy objects that configure firewall settings on all the computers in a domain, and ensured that users cannot override those settings.
• You created a set of basic domain isolation rules that restrict domain-member computers from accepting network traffic from computers that are not members of the domain.
• You created connection security rules that isolate servers which store sensitive information, by restricting access to only computers that are members of approved groups.
• Finally, you created rules that enabled specific trusted computers to bypass firewall requirements.
Additional References
For more information about the technologies discussed in this guide, see the following locations.
Windows Firewall with Advanced Security
• Windows Firewall (http://go.microsoft.com/fwlink/?linkid=95393)
This page contains links to the documentation currently available for Windows Firewall, for both the version available on Windows XP with Service Pack 2 (SP2) and Windows Server 2003 with SP2, and the version available on Windows Vista and Windows
Server 2008.
• Windows Firewall with Advanced Security – Diagnostics and Troubleshooting (http://go.microsoft.com/fwlink/?linkid=95372)
This article describes how Windows Firewall with Advanced Security works, what the common troubleshooting situations are, and which tools you can use for troubleshooting.
IPsec
• IPsec (http://go.microsoft.com/fwlink/?linkid=95394)
This page contains links to the documentation currently available for Internet Protocol security (IPsec), for both the version available on Windows XP with Service Pack 2 (SP2) and Windows Server 2003 with SP2, and the version available as connection security rules in
Windows Firewall with Advanced Security on Windows Vista and Windows Server 2008.
• Simplifying IPsec Policy with the Simple Policy Update (http://go.microsoft.com/fwlink/?linkid=94767)
This article describes a downloadable update available for Windows XP with SP2 and Windows Server 2003 with Service Pack 1 (SP1). (The update is built into Windows Server 2003 Service Pack 2). The update changes the behavior of IPsec negotiation so that the IPsec policy rules can be simplified, in some cases significantly reducing the number of required IP filters and their ongoing maintenance.
Server and Domain Isolation
• Server and Domain Isolation (http://go.microsoft.com/fwlink/?linkid=95395)
This page contains links to documentation that support the most common uses for IPsec: server and domain isolation. Documentation is available for both the IPsec version available on Windows XP with SP2 and Windows Server 2003 with SP2.
Group Policy
• Group Policy (http://go.microsoft.com/fwlink/?linkid=93542)
This page contains links to the documentation currently available for Group Policy, for both the version available on Windows XP with SP2 and Windows Server 2003 with SP2, and the version available on Windows Vista and Windows Server 2008.
• HOWTO: Leverage Group Policies with WMI Filters (http://go.microsoft.com/fwlink/?linkid=93760)
This article describes how to create a WMI filter to set the scope of a GPO based on computer attributes, such as operating system version number.