About BPOSS (Business Productivity Online Standard Suite)
Microsoft Business productivity online standard suite is a set of Microsoft Hosted Communication Solution Including Exchange Online, SharePoint Online, Office Live Meeting and Office Communication Online.
Features of the Business Productivity Online Suite
E-mail and calendar functions — Exchange Online delivers e -mail services including spam filtering, anti-virus protection, and synchronization of mobile devices. Through Microsoft Office Outlook 2007 and Microsoft Office Outlook Web Access, you can use the advanced e -mail, calendar, contact, and task management features of Exchange Online. Office Outlook Web Access enables users to access their e-mail messages from almost any browser—whether the user is in the office or on the road.
E-mail coexistence and migration tools — The Business Productivity Online Suite includes e -mail coexistence and migration tools. If you have Active Directory services and Micro soft Exchange Server, the Microsoft Online Services Directory Synchronization tool synchronizes your user accounts, contacts, and groups from your local environment to Microsoft Online Services. This tool also makes your Microsoft Exchange Global Address List (GAL) available in Exchange Online. Use the Microsoft Online Services Migration Tools to forward copies of your Exchange Server mail to your Exchange Online mailboxes. You can also use the Migration Tools to copy content from your Exchange Server, POP3, or IMAP4 e-mail server mailboxes to your Exchange Online mailboxes.
Document collaboration and workspaces — SharePoint Online allows you to share and work together on documents, maintain version control for shared documents, create intranet sites to manage projects and project workflows, post calendar information, and set up wikis and blogs.
Web conferencing — Office Live Meeting allows you to hold online meetings with colleagues, customers, and partners in real time. Office Live Meeting participants can convene online to share documents, ask questions, work on a virtual “whiteboard,” and talk to each other during the meeting.
Microsoft Online Services Administration Center — The Administration Center gives you an online management portal to manage your services and users. From the Administration Center, service administrators can import multiple user accounts, use e -mail migration tools, create distribution lists, create SharePoi nt site collections, and submit service requests to Microsoft Online Services Technical Support.
Microsoft Online Services Sign In application — The Sign In application is a tool that automatically sets up services and allows users to access all of their s ervices with no need to sign in each time they use them. The Sign In application is available from both the Administration Center and My Company Portal.
About Exchange Online
Microsoft Exchange Online is a hosted enterprise messaging solution based on Mic rosoft Exchange
Server 2007 and provides the following:
Improved e-mail security
“From-anywhere” access to e -mail for your employees
Enhanced operational efficiency for your IT staff
25GB mailbox storage per standard license
Exchange Online Standard Edition Features
Standard Parameters | 25 GB of mailbox storage allocated for each user |
Standard Parameters | E-mail, shared calendar and contacts |
Standard Parameters | Use of HTTPS helps keep Internet access secure |
Standard Parameters | Virus/spam filtering via Microsoft Forefront Online Security for Exchange |
Standard Parameters | Single sign-on capability via Sign In application |
Standard Parameters | 24/7 Web form and phone-based Tier 2 support for IT administrators |
Standard Parameters | User subscription fee |
Deskless Worker License | Low cost offering to users who do not currently have messaging capabilities |
Deskless Worker License | Outlook Web Access Light , 500 MB mailbox, Global Address List (GAL) access, Contacts |
Client Support | Microsoft Office Outlook 2007 and Outlook 2003 via Outlook Anywhere |
Client Support | Outlook Web Access with Internet Explorer ® 6.0 or later or Firefox 3.0 or later |
Client Support | Support for POP client connectivity |
Mobility | Push e-mail, calendar, contacts, tasks and calendar with GAL integration, remote password reset and device wipe. Compatible with devices that use Exchange ActiveSync®, including Microsoft Windows Mobile 6.0 and above; iPhone 2.0, and many Nokia phones. |
Mobility | Support for BlackBerry devices that use Microsoft’s Hosted BlackBerry service, BIS, or NotifySync. |
Data Protection Service | Daily backup |
Deleted item retention and deleted mailbox recovery | |
Business continuity and disaster recovery | |
Security | Regular security assessments |
Security | Continuous intrusion monitoring and detection |
Service Level Agreements | 99.9% scheduled uptime with financially backed service level agreements |
Migration Tools | Migrate POP/IMAP and Exchange Server mailbox data to Exchange Online |
Directory Synchronization Tool | This Microsoft tool can synchronize your on-premise Active Directory with the Microsoft Online Active Directory |
E-mail Coexistence | Email coexistence enables customers to maintain both on-premises Exchange Server mailboxes and Exchange Online mailboxes in an integrated email environment. |
Administration Center | Centralized, Web-based access for configuration and administration of Exchange Online services, including mailboxes, user settings, distribution lists, company settings, and staff settings |
Administration Center | Administrators download Directory Synchronization, Migration, and Sign In tools here |
Sign In Application | Provides single sign-on capability and access to all Microsoft Online Services |
International Availability | Exchange Online is available in 20 countries |
Exchange Online Key Features
Exchange Online Key Features | Deskless | Standard |
Mailbox Storage | 500MB | 25GB |
Calendar, Contacts, Directory | Yes | Yes |
Office Outlook W eb Access Light | Yes | Yes |
Office Outlook W eb Access Premium | No | Yes |
Office Outlook 2007 Access | No | Yes |
Mobility Access | No | Yes |
Important Microsoft URLs for Exchange Online Administration, OWA Access and Mobile Devices Access
Global URLs
T he follow ing global URLs provide access t o t he appropriat e regional port als regardless of w here you are locat ed.
![]()
![]()
![]()
![]()
Administration Center https://admin.microsoftonline.com My Company Portal https://home.microsoftonline.com Customer Portal https://mocp.microsoftonline.com/site Partner Administration Center * https://partner.microsoftonline.com
Outlook Web Access URLs
Your Microsoft Office Outlook Web Access (OWA) URL is determined by the storage location of your Microsoft Online Services data. The storage location is generally the one closest to your company headquarters.
![]()
![]()
![]()
Asia Pacific (APAC) https://mail.apac.microsoftonline.com
Europe, the Middle East, and Africa (EMEA) https://mail.emea.microsoftonline.com
North America https://mail.microsoftonline.com
Mobile Device URLs
Your mobile device URL is determined by the storage location of your Microsoft Online Services data. To connect to Microsoft Exchange Online, your cellular service plan must support W indows Mobile.
![]()
![]()
![]()
Asia Pacific (APAC) https://red003.mail.apac.microsoftonline.com
Europe, the Middle East, and Africa (EMEA) https://red002.mail.emea.microsoftonline.com
North America https://red001.mail.microsoftonline.com
Admin Login Page
To login at admin console we need to open the Internet Explorer and type the URL
https://admin.apac.microsoftonline.comand it will open the screen as per below…

Type the user name and password and click on Sign in

Home Page
After login we will get a Home page of Exchange Online Services from here we can view the Status of Exchange Online Service, My Company Properties and Microsoft Online Service Sign in Application download link.

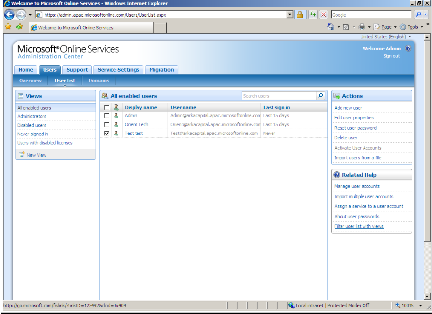
Users Administration Overview Page
To views the users license information, creation of users, Addition of own company domain or buy the additional license please click on users tab on administration page.

Existing Users List
To view the existing created users, creation of new user, reset an existing user password, view the disabled users information and users with disabled license, please click on Administration Page -> Users Tab- User List tab

Domain Management Page
To view the existing domain list, creation of own new domain or edit the existing settings please click on
Administration Page -> Users – Domains tab

Support Overview Page
To raise a service ticket for support on Exchange Online related iss ue or view the existing service request
related ticket please click on Support tab on Administration page…

Support Service Request Page
To open a new service request, Edit a existing service request, close a service request or reactivate a service request, Please click on Administration Page -> Support -> Service Request tab…

Support Download Page
To download the Microsoft online service sign in application .Net Framework and other application please click on Administration Page -> Support -> Download Tab

Support Search Page
To search a Microsoft Online service KB article please click on Administration Page -> Support ->Search Tab

Service Settings Overview Page
To view the Exchange Online Allocated Storage Space or Total Storage Space, Crea tion of New External Contacts, New Distribution Group, Safe Sender Addition, Block Sender Addition and New Conference Room creation please click on Administration page -> Service settings -> Overview Tab

Service Settings Exchange Online Page
To view the Existing Contacts, Distribution lists, Safe Sender, Blocked Sender etc. Please click on
Administration page -> Service settings ->Exchange Online Tab

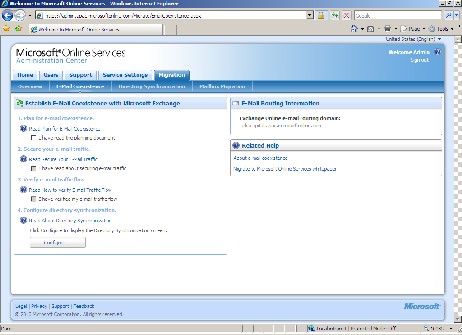
Migration Overview Page
For Migration of Existing Exchange Server user’s mailboxes or coexistence of existing Exchange organization (In house exchange server) please click on Migration tab.

Migration E-Mail Co-existence Page
For E-Mail planning and Co-existence please click on Administration page -> Migration -> E-Mail Co- existence tab
Migration Directory Synchronization Page
For Existing (In house) Active Directory synchronization please click on Administration page -> Migration ->Directory Synchronization tab


Migration Mailbox Migration Page
For Migration of Existing Exchange Server (In house) mailboxes, we will have to download the Migration tools to download it please click on Administration page -> Migration -> Mailbox Migration tab

How to add new Users
To add a new user mailbox and emai l id please click on Administration page -> Users Tab -> Add New User

Type the user name, display name, phone number etc. as per below mention screenshot…

To make a user as a Admin central Administrator click on Do you want this user to have service administrator permissions Yes button and also if you want to enable this user right now just click on Do you want to enable this user’s account yes button
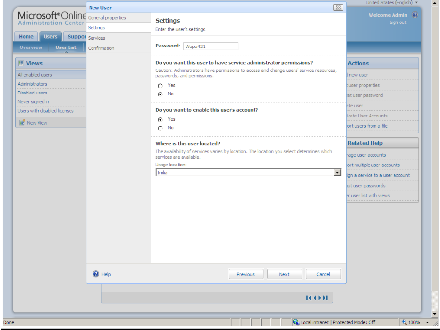
To define the user mailbox quota just select the size from mailbox size drop down as per below screenshot.

Now new user email id has been created to send this information to particular email id please type the email id on Send Summary via e-mail blank space and just click on send button.
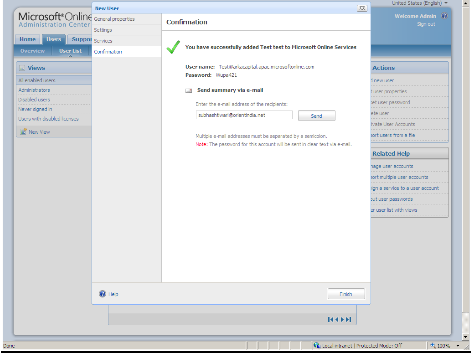
After clicking on send button it will gives you a summary that email id creation information has been sent to the email id which we have provided. The below screenshot is a summary…

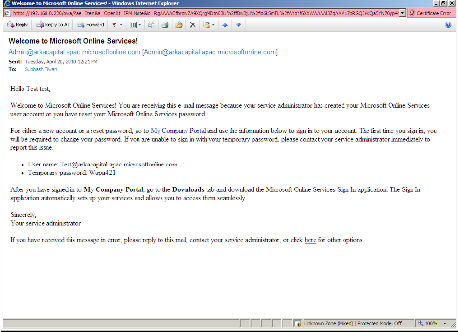
On the below screenshot user email id creation summary, User Name , Temporary Password information will show you after recei ving the email confirmation on provided email id.
We can view the new user email id and name on below screenshot after completion of new user creation.

How to Reset a User Password
To reset the user password just select the user and click on reset password button…

After click on reset password button it will show you the option that do you want to send the temporary email password on email if you want to send just type the email id, I am selecting here no and then click on next button…

Type the new password and click on reset button….

After clicking on reset button it will gives you a confirmation screen that your password has been reset.

How to Edit Users Properties
To edit the user properties just click on Administration console -> Users Tab -> User List -> Select the user-> Click on Edit User properties as per below screenshot….

To change the properties just change and then click on save button.

To change the settings tab click on settings tab and change as you want and click on Save button.

To change the user quota settings just click on services tab and select the quota size and click on save button.

How to Delete a User
To delete the user just click on Administration console -> Users Tab -> User List -> Select the user->
click on delete user button.
After click on delete user button it will ask you a confirmation just click on yes button to delete the user.

After deletion of user it will get disappear from user’s console.

How to Create a New Domain for Our Company
To create own company domain just click on Administration Console -> Users Tab -> Domains tab, It will show you a default domain which has been created by Microsoft. Just click on new button to create a new domain…

Just type the new domain name and select whether it’s a Authoritative (Exchange Online will host all mailboxes) or External domain (Mailbox hosted on outside org and MX pointer pointed to outside) and then click on create button.

After creation of new domain it will show you a confirmation that your new domain has been created and on below screen of confirmation there is one small tab for Verification of domain because we will have to verify this domain by creating CNAME record to verify just click on that if no just leave blank .


How to verify above Create Domain
To verify the domain name just select the domain name on Administration Console -> Users Tab -> Domain Tab and click on verify now.

To verify select the registrar, if your registrar is not available just select other and click next button.

The below screenshot will show you one information regarding the Addition of CNAME record on our existing ISP DNS server just note down it and send it to ISP to create same entry after entry creation completed just click on verify button to complete the verification.


Download the Microsoft Online Service Sign IN for Configuration of Outlook Profile
For Configuration of Desktop side outlook profile we need to download Microsoft Online service sign in Application tool to download it just go to Administration Console -> Support Tab -> Download Button and click on Microsoft Online Sign in download button..
For Windows XP user they will have to install .Net Framework 3.0 first then install it. Windows Vista Already has .Net Framework.

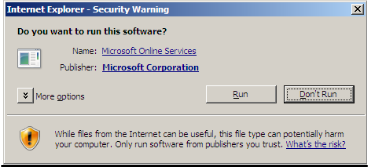
Click save button to save it on your hard disk or run button to run it from directly online.

On confirmation prompt to run this software we need to click on run button …
Welcome screen just click on next button to continue for installation…

On license terms screen just select I accept and click on next button to continue…

Select the path for installation file location and click on next button also if you want to create a shortcuts on desktop click on create a shortcut on the desktop radio button.

On ready to install screen just click on install button….

The below screen will show you the progress bar for installation…

After completion of Microsoft Online Service Sign in Just click on finish button and select the check box to start Microsoft Online Service Sign in.
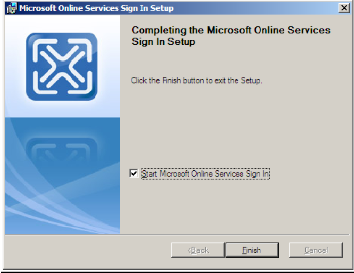
After finishing the installation it will launch the Microsoft Online Service Sign in application to login on
application just type the user name and password and then click on Sign in button….

Please type the user name [email protected]and password which Microsoft person given at the time of buy the license and then press the sign in button to launch the configuration of outlook profile wizard and then it will complete automatically.

After completion it will launch the Online Service status sign in and on that there are two icon One is E – Mail and Calendaring and My Company Portal…

On Option screen please click on automatically sign in when windows start and other option as you want and click on apply button.

On About screen it will show you the sign in application version and license term.

Once you click on E-Mail and Calendaring button it will launch the Outlook as per below…

For sending a mail to test the connectivity and configuration just select a new email button and type the email id and type the message and click on send button.

After sending the email it will get received by on another mailbox just reply to that mail to check receiving side configuration

After replying on that mail it will show you on your outlook that mean you outlook has been configure successfully.

Exchange Online Outlook Anywhere Configuration Settings after Microsoft Online Service Sign IN Authentication
To check the Outlook Anywhere settings please go to Outlook ->Tools ->Accounts Settings -> Change Button -> More Settings ->Connection Tab -> Exchange Proxy Settings and then you will get complete settings as per below…

On below screen it will show you Exchange Server name and User name .

How to Access Email from OWA
To access OWA page Click on Microsoft Office Outlook Web Access button on Microsoft Online Service
Sign in button…

On OWA page just type the username and password to login the OWA page and then click on Log in.

After login you will get below screen to access your email and contacts.

How to Create New Contacts
To create a new contacts go to Administration Console -> Server Settings -> Click New Contacts

Just fill the new contacts creation information e.g. First Name, Last name, Email id etc.. and click on create.

After clicking on Create button t will show you a confirmation screen that you have successful created contacts.

On below screen you will get newly created contacts information.

Edit Contacts Properties
To edit the contacts information just selects the contact and go to Administration Console -> Server
Settings -> Edit Contact Properties

Just change the information as you want and then click on save button to change the contacts info.

How to create a Distribution Lists
To create a new Distribution List just go to Administration Console -> Server Settings ->Click on New Distribution list

Fill the distribution list name and email id and click on next…

Just select the user and click add button to make the user to distribution list member.

After adding the user you will get the below screen, It will show that it’s added.

To make the contacts member of distribution list member just select the List type as a Contacts and on below screen select the contacts and click on add button.

After selecting the contact it will show you right hand side that means its member of Distribution list.

After selection users and contacts just click on create button to complete the Distribution list creation.

After clicking on finish button it will show you a confirmation that distribution list has been created.

After completion of Distribution list creation it will show you on Administration console -> Service Settings ->Exchange Online -> Distribution Lists.

How to add block sender
To block the sender go to Administration console -> Service Settings ->Exchange Online ->Click on New Blocked Sender

Just type the blocked sender email id, domain name or IP address, here I am typing the email id after typing the email id click on save button.

After clicking on save button you will get the list of blocked sender list on Administration console -> Service Settings ->Exchange Online -> Blocked Senders.

How to add Safe Sender
To add the safe sender list just go to Administration console -> Service Settings ->Exchange Online –
>Click on New Safe Sender…

Type the email id, IP address or domain name to add the list on safe sender list and click on save button.

After clicking on save button you will get the list of blocked sender list on Administration console -> Service Settings ->Exchange Online -> Safe Senders.
